1
What to expect in the first week
The most common reason people stop after one attempt is a mistaken expectation. So let us start there.
- The first document is usable but not yet your style
- That is normal and not a sign that something is broken. The AI does not know your practice yet. It does not know whether you write in the first person plural, how long your assessments are, or which details must never be missing in your letters.
- Test with a real consultation
- For your first attempt, do not use an invented scenario but a real consultation. Constructed examples produce constructed results, and they hide exactly the places where your daily work actually snags.
- Expect three to five sessions
- That is usually how long it takes for the output to settle. Not because the system learns slowly, but because that is the time you spend recording what you expect.
- The one step that matters
- Every time you change something in a draft, that is a hint about what belongs in the rule set or the template. Write the correction down once and you never make it again. Repeat it by hand every time and all you have is a faster typewriter.
2
The session: where the work happens
Everything starts with a session. A session is one patient encounter, and any number of documents can come out of it. You create one with "New session" at the top left.
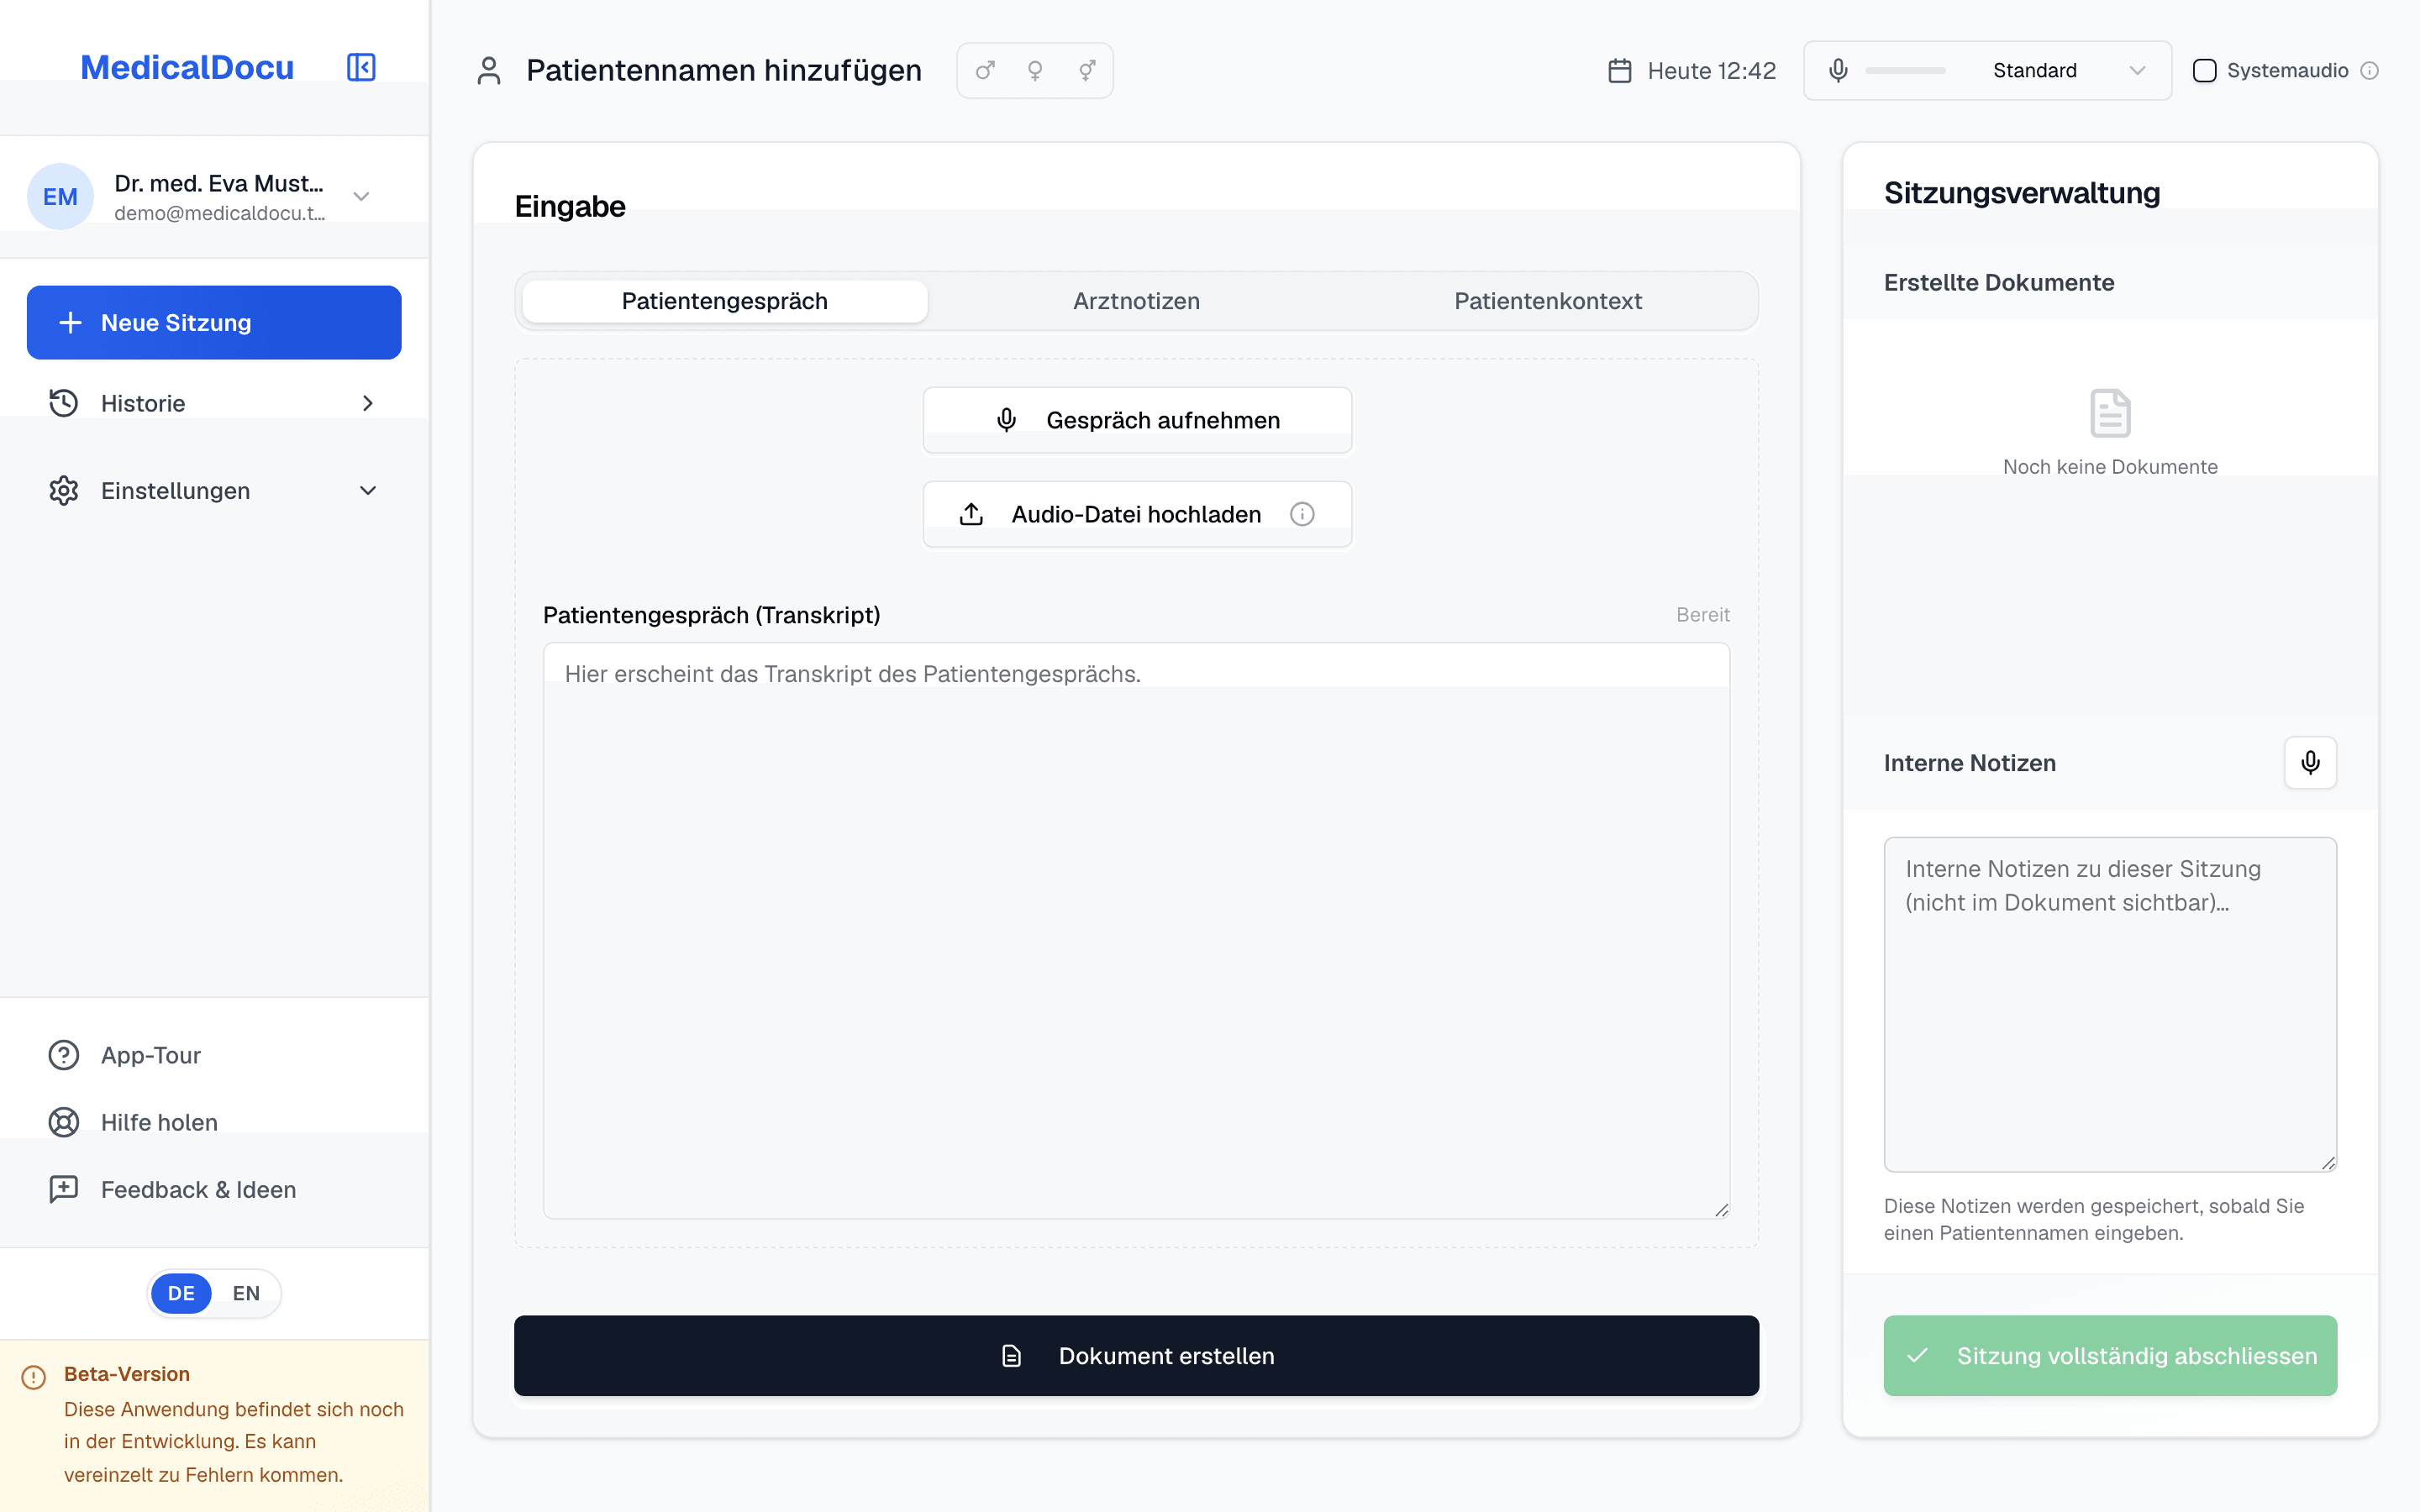
- Patient name
- Enter the name at the top. It is used to find the session in the history and appears in the document. Without a name the internal notes cannot be saved, but everything else works.
- Patient details
- Date of birth, address, phone, email and gender are optional. Whatever you fill in, the AI uses in the document, for example in the address block or the salutation. Whatever you leave empty, it does not invent.
- Three tabs for three kinds of input
- "Patient conversation" holds the transcript of the consultation. "Clinician notes" are your internal bullet points: diagnoses, medication, findings. They do not appear verbatim in the document but do inform it. "Patient context" is for prior findings and background the AI should know. Use all three or just one.
- Recording the consultation
- One click starts the recording, a second one stops it. Text appears in the transcript field roughly every 20 seconds while you are still recording, so you do not have to wait until the end. There is deliberately no pause button: to interrupt, stop the recording and start a new one. Both parts belong to the same session.
- Choosing the microphone
- At the top right, next to the time, you pick the input device. For trying things out, the built-in laptop microphone in a quiet room is fine. For daily use in the consulting room we recommend a simple omnidirectional USB desk microphone placed between you and the patient. A headset is the worse choice here: it mainly picks up you and leaves the other person faint.
- System audio for video and phone consultations
- The "System audio" switch captures the sound of a browser tab instead of the microphone, which lets you record calls on Zoom or Teams. The browser asks which tab to share and you have to confirm "share tab audio". On macOS this only works with tab sharing, not with full screen sharing.
- Uploading an audio file
- If you work with a separate dictation device, simply upload the file. Supported formats are mp3, mp4, mpeg, mpga, m4a, wav, webm and dictations from Olympus and Philips recorders (.dss), up to 2 hours of audio. Longer recordings are split into sections automatically.
While recording, audio is saved in chunks. Next to the transcript you can see how many chunks arrived. If a number appears next to "failed", exactly that stretch is missing from the transcript. Add a short summary of it to the clinician notes.
3
Creating a document: the four settings
At the bottom you find "Create document". The dialog that opens decides almost everything about the result. It is worth understanding these settings once instead of clicking past them.
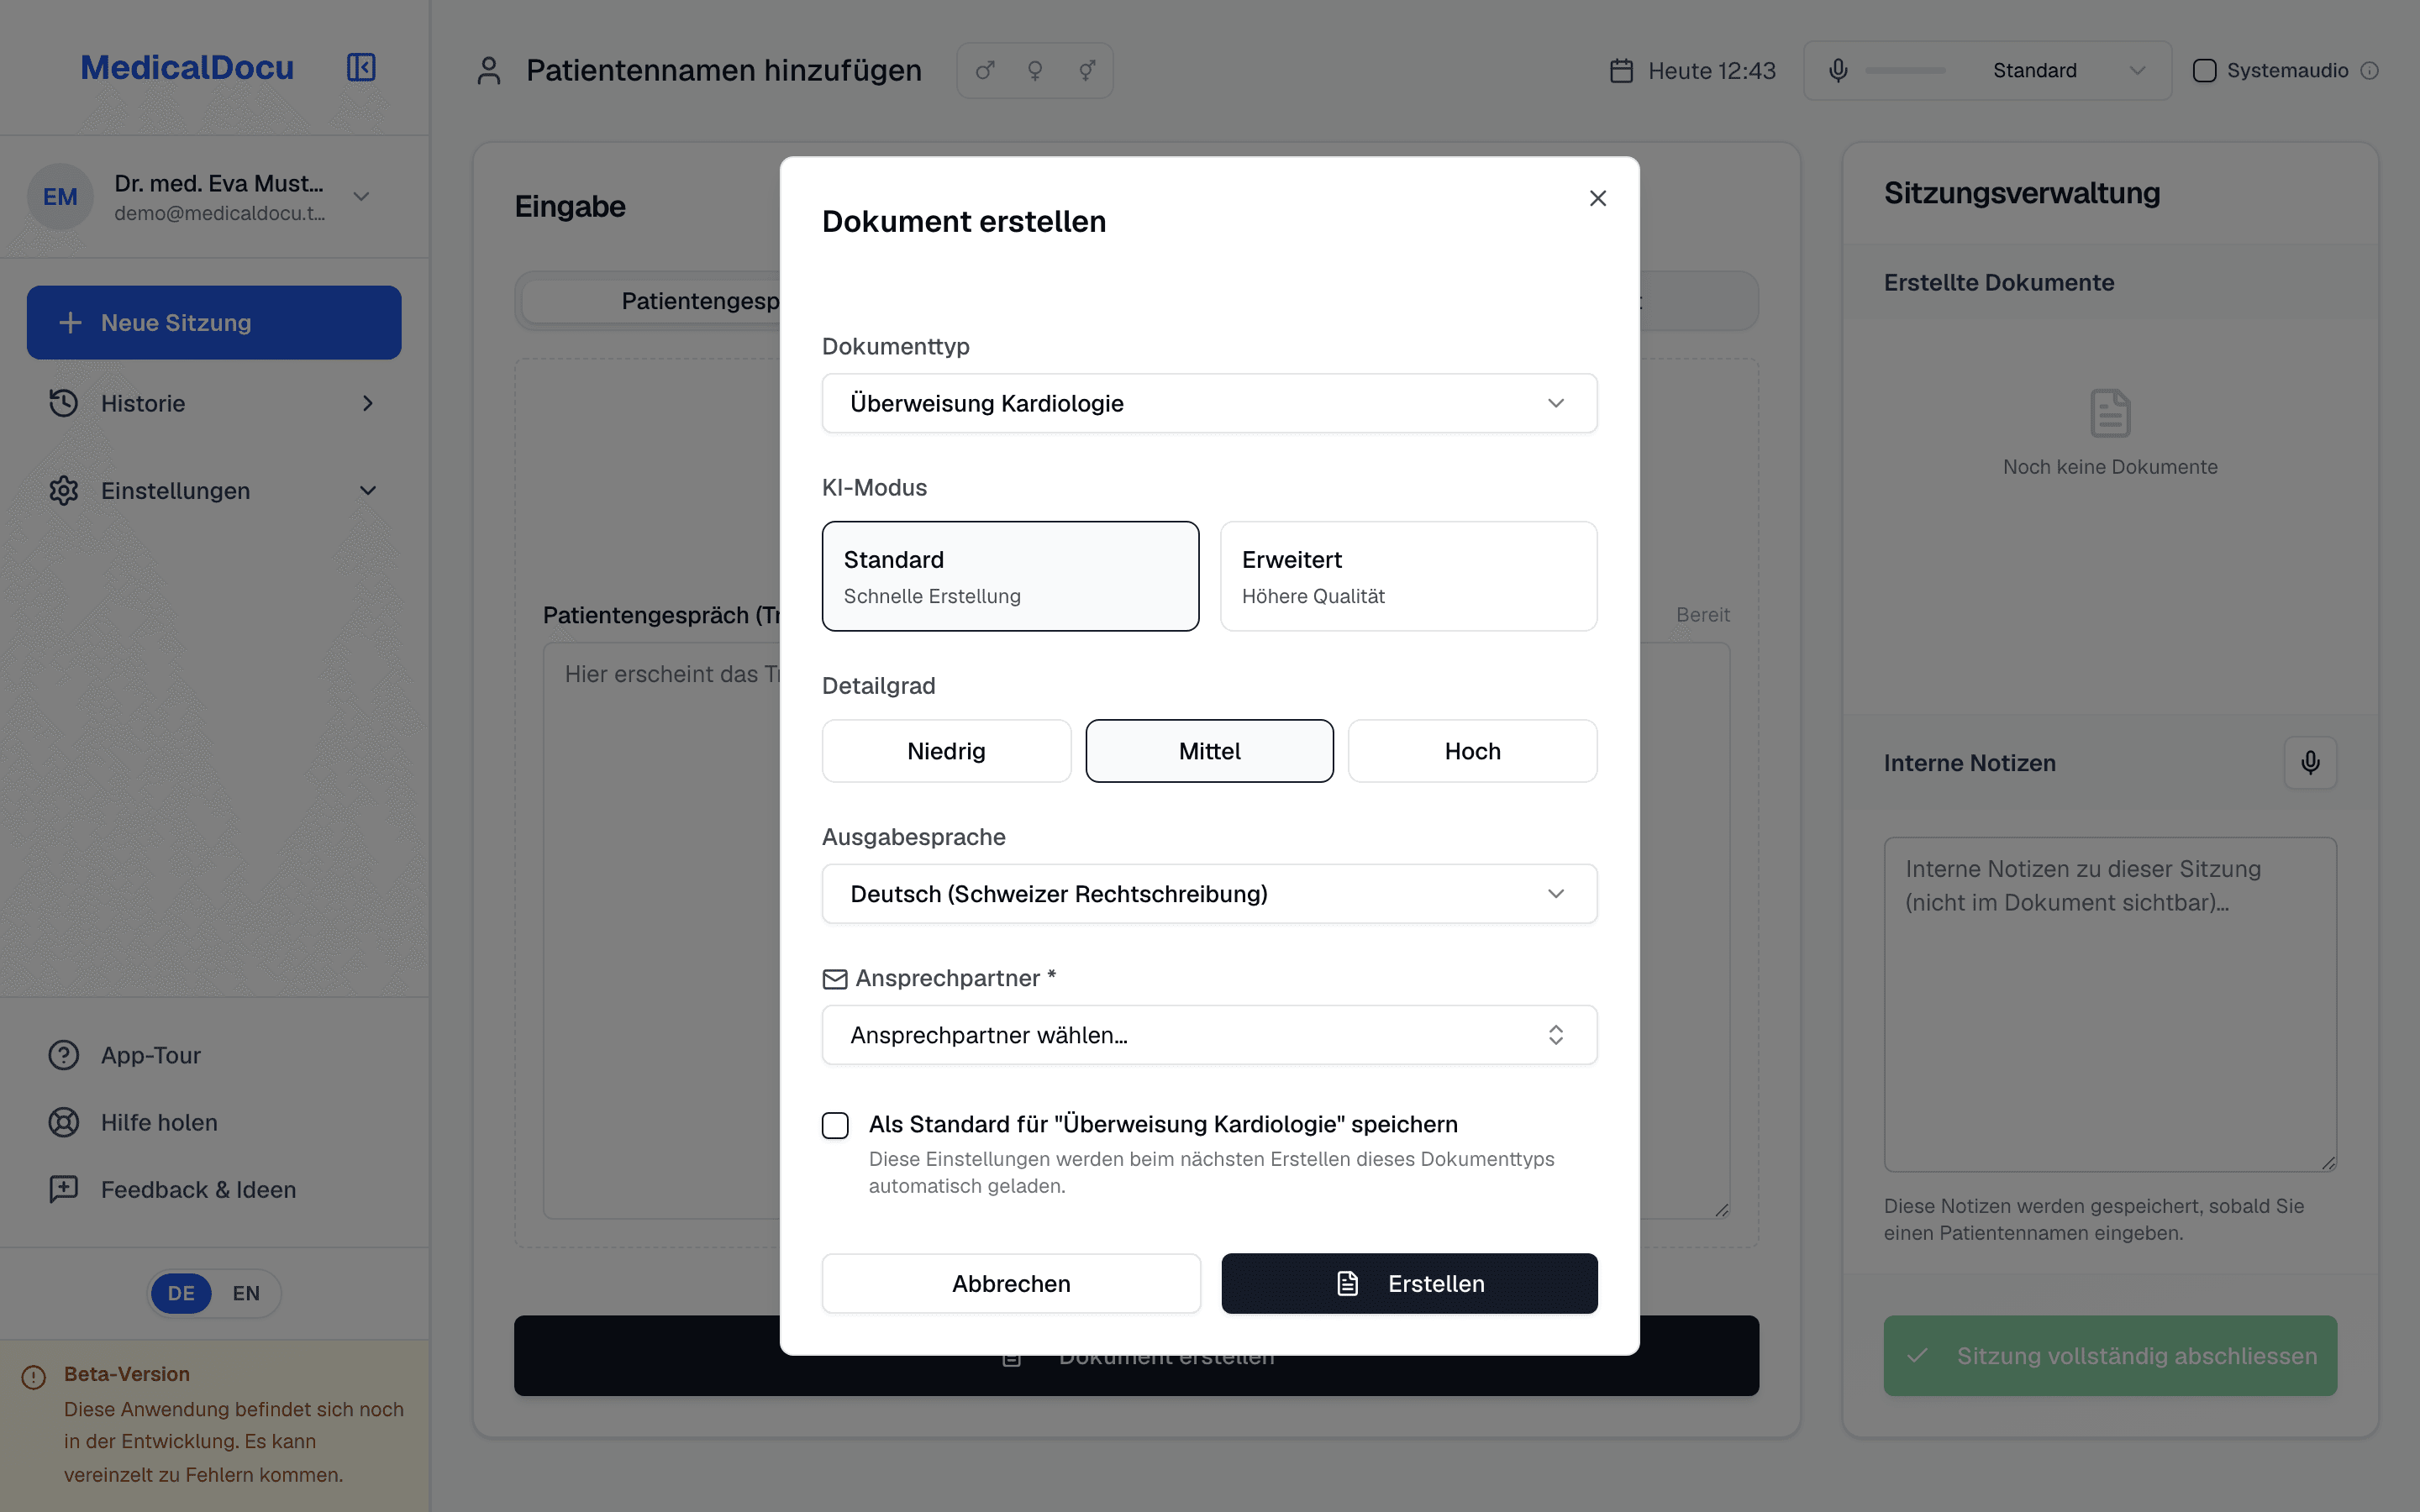
- Document type
- This is where you pick the template. You see your own templates and the system templates that ship with the product. The template determines which sections the document has and in what order.
- AI mode: Standard or Advanced
- "Standard" is fast and fine for progress notes, short records and anything routine. "Advanced" takes more time and produces noticeably better text for long consultations, complicated courses of treatment and multiple diagnoses. If a document falls short, a second attempt on "Advanced" is the first thing to try, not rewriting by hand.
- Level of detail: Low, Medium, High
- This controls length. "Low" summarises tightly and suits internal progress notes. "Medium" is the default and covers most letters. "High" keeps details from the conversation that would otherwise be dropped and is worth it for referrals and reports whose recipient does not know the case.
- Output language
- The output language is independent of the language spoken. You can hold the consultation in Swiss German and have the letter written in French, Italian or English.
- Recipient
- This is where you choose who the document goes to. The list comes from your saved recipients so that the salutation and address block are correct.
- Save as default
- The checkbox at the bottom remembers mode, level of detail and language for this document type. Next time everything is preselected and you only click "Create". If you always take the same route, this saves a handful of clicks every day.
4
Review, revise, export
The draft appears in a window where you can edit it directly. Nothing goes anywhere automatically. You decide what happens to the text.
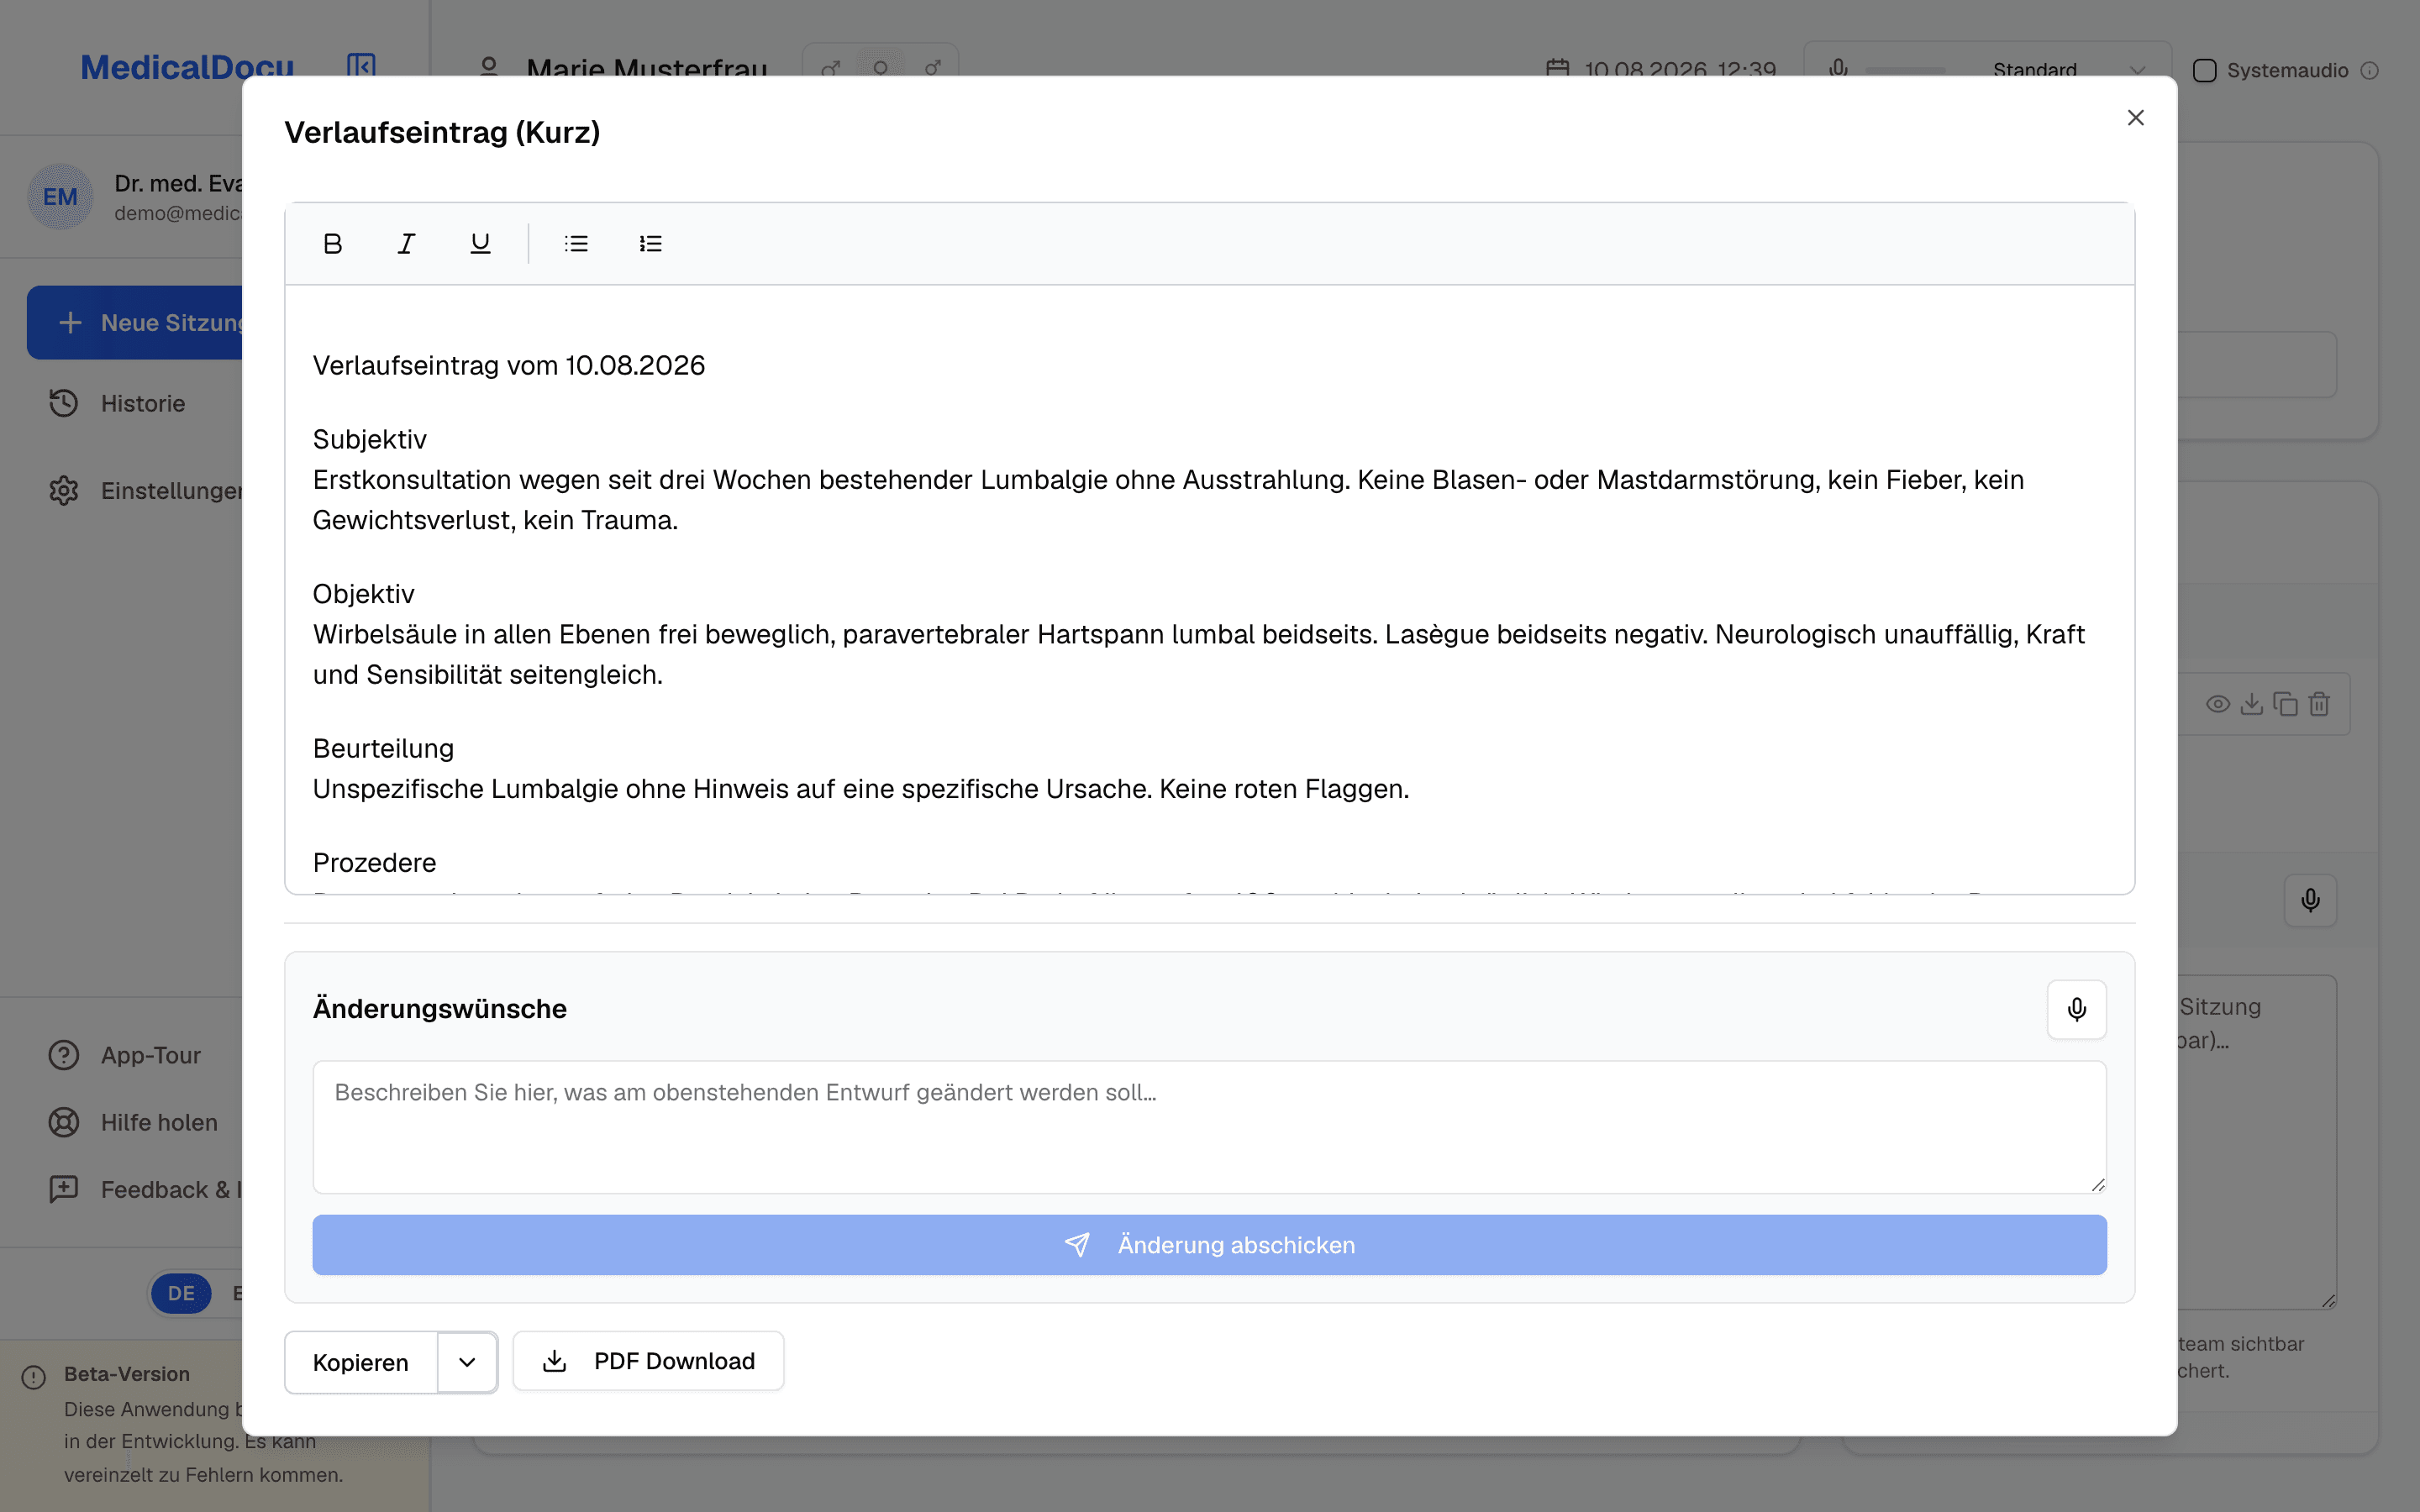
- Editing the text directly
- The draft is an editor with bold, italic, underline, bullet lists and numbered lists. Small corrections take seconds here.
- Revision requests to the AI
- Below it there is a field for revision requests. Describe in plain words what should be different: "the history is too long, cut it to three sentences" or "include the medication dosages". Using the microphone icon you can dictate the request instead of typing it.
- Copy and PDF
- "Copy" puts the formatted text on the clipboard. The small arrow next to it copies it without formatting instead, in case your practice management software handles that better. "PDF download" produces a document with your practice letterhead. For the layout you choose between the address window on the right following the Swiss standard and on the left for international envelopes.
Any correction you make twice belongs in the rule set. If you write "this is too verbose" for the third time, that is not an AI problem, it is a missing rule.
5
Several documents, closing, finding again
Session management sits on the right. From one recording you produce any number of documents without repeating the input.
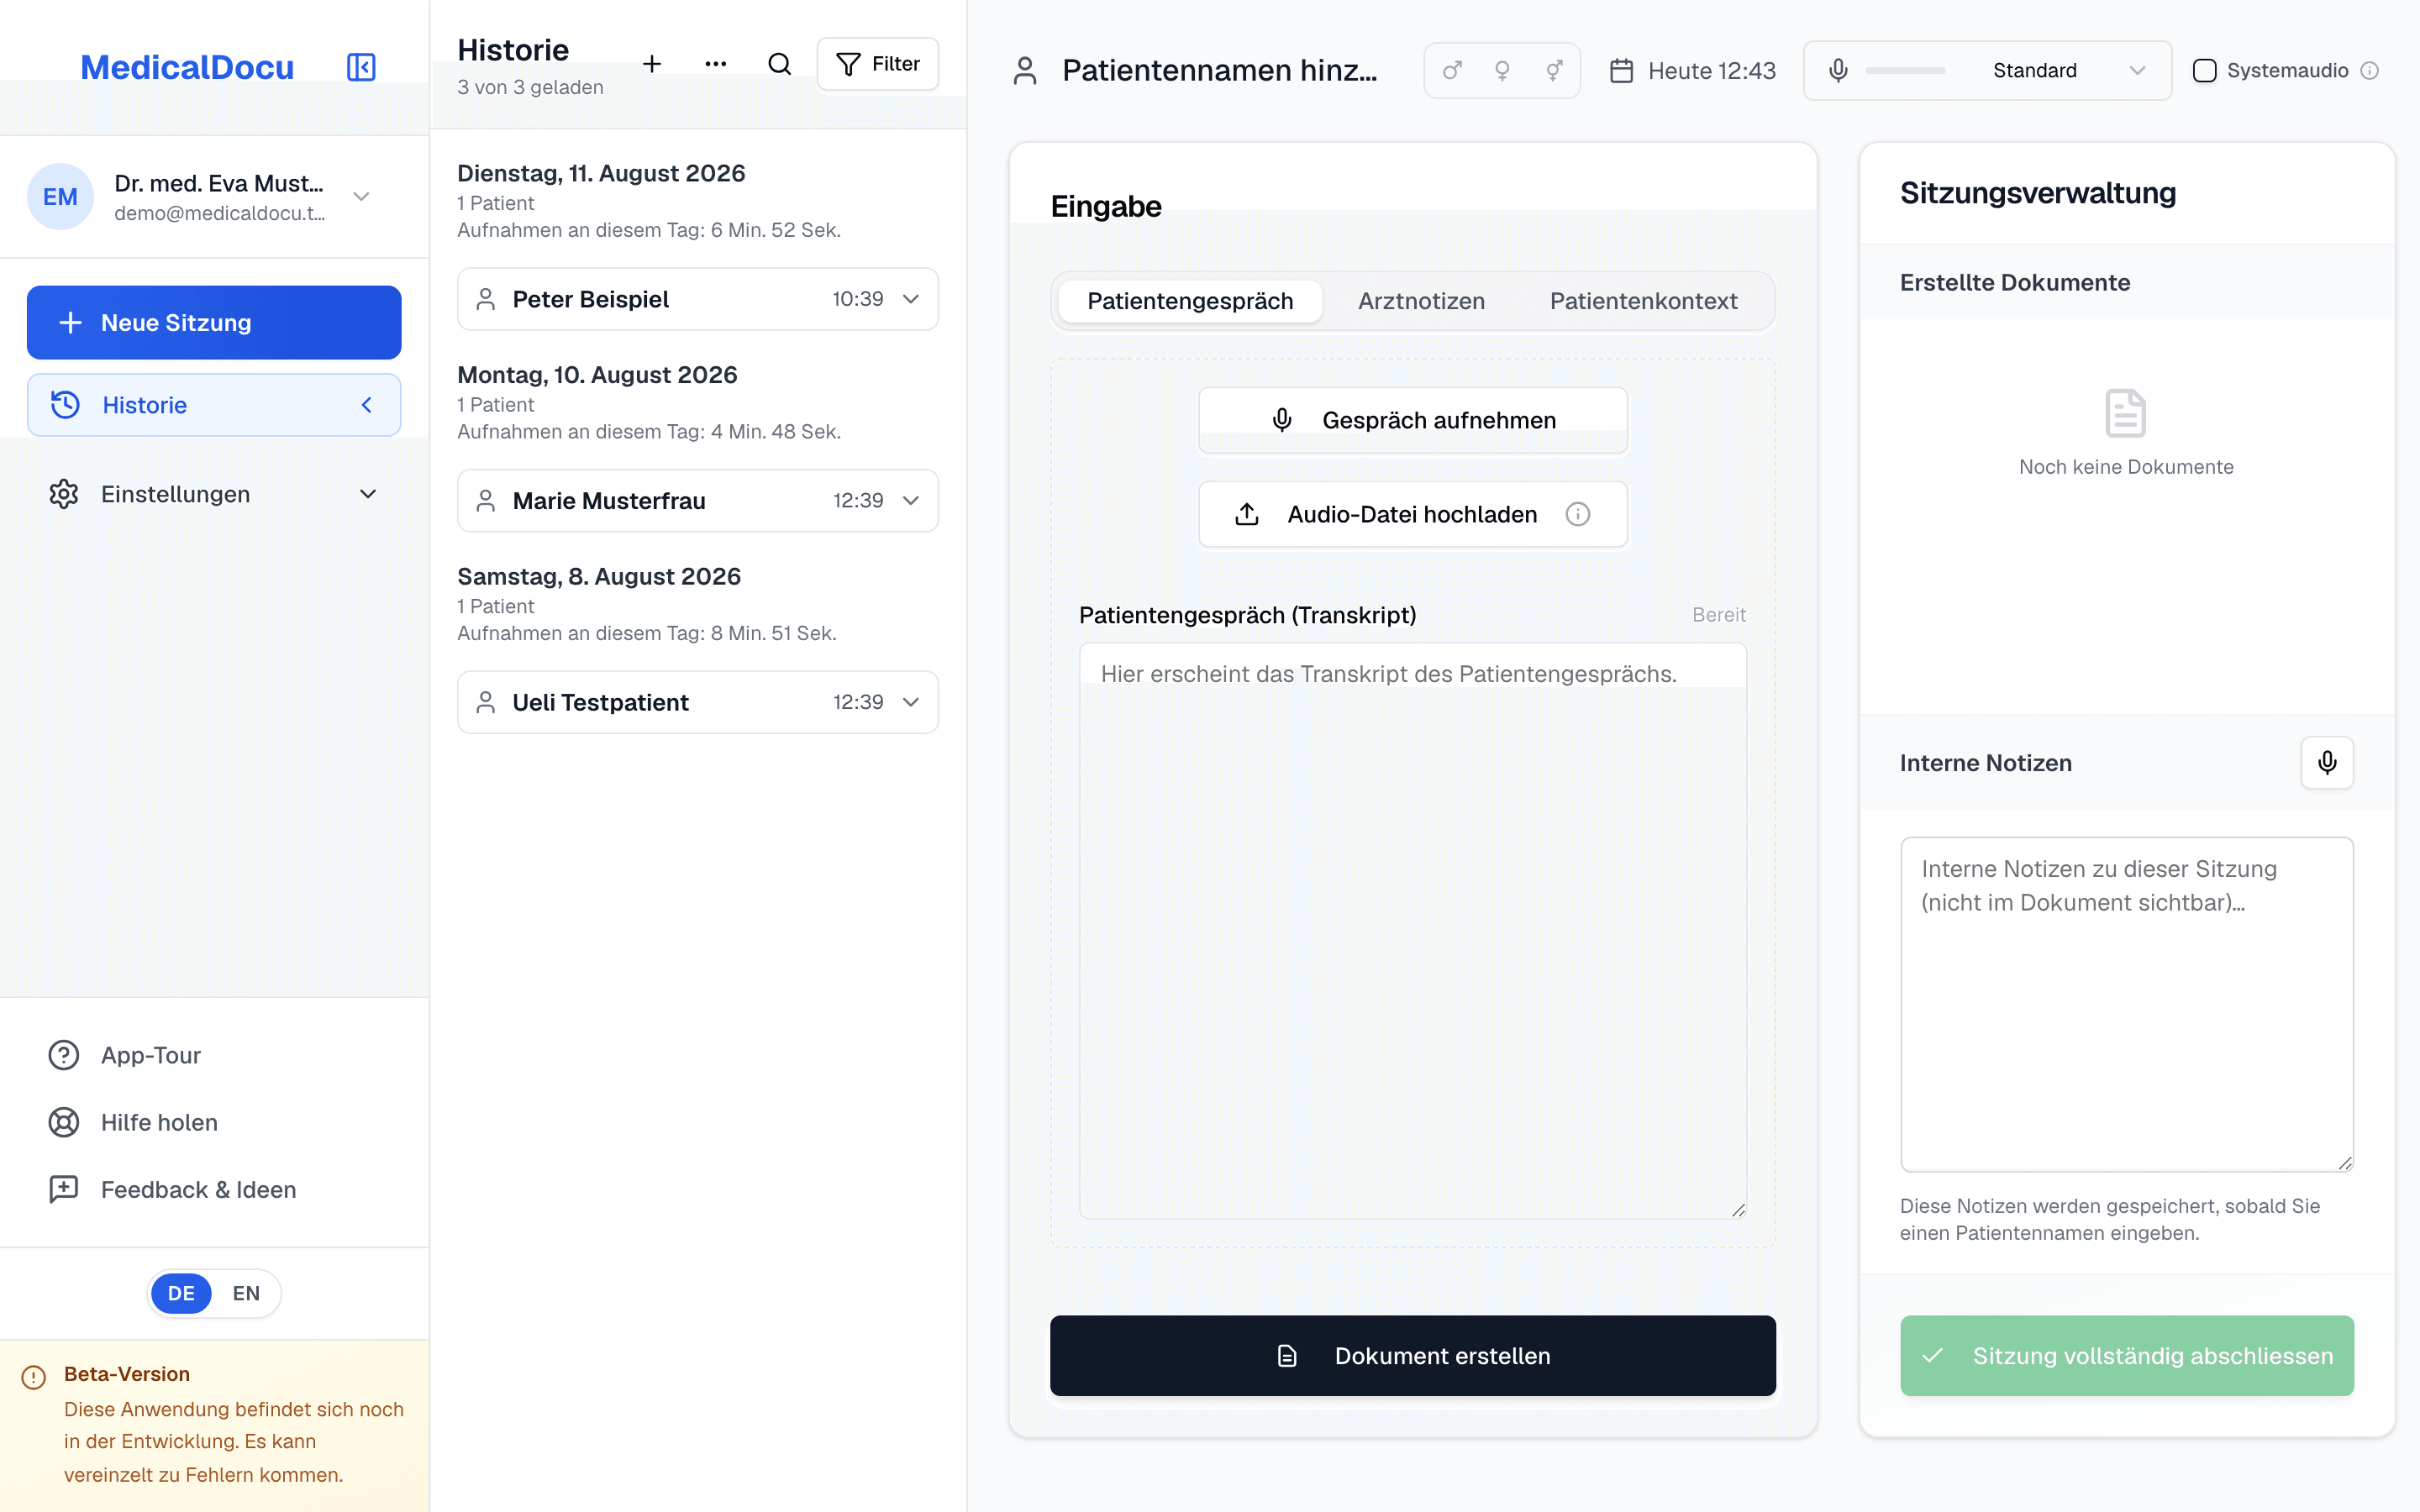
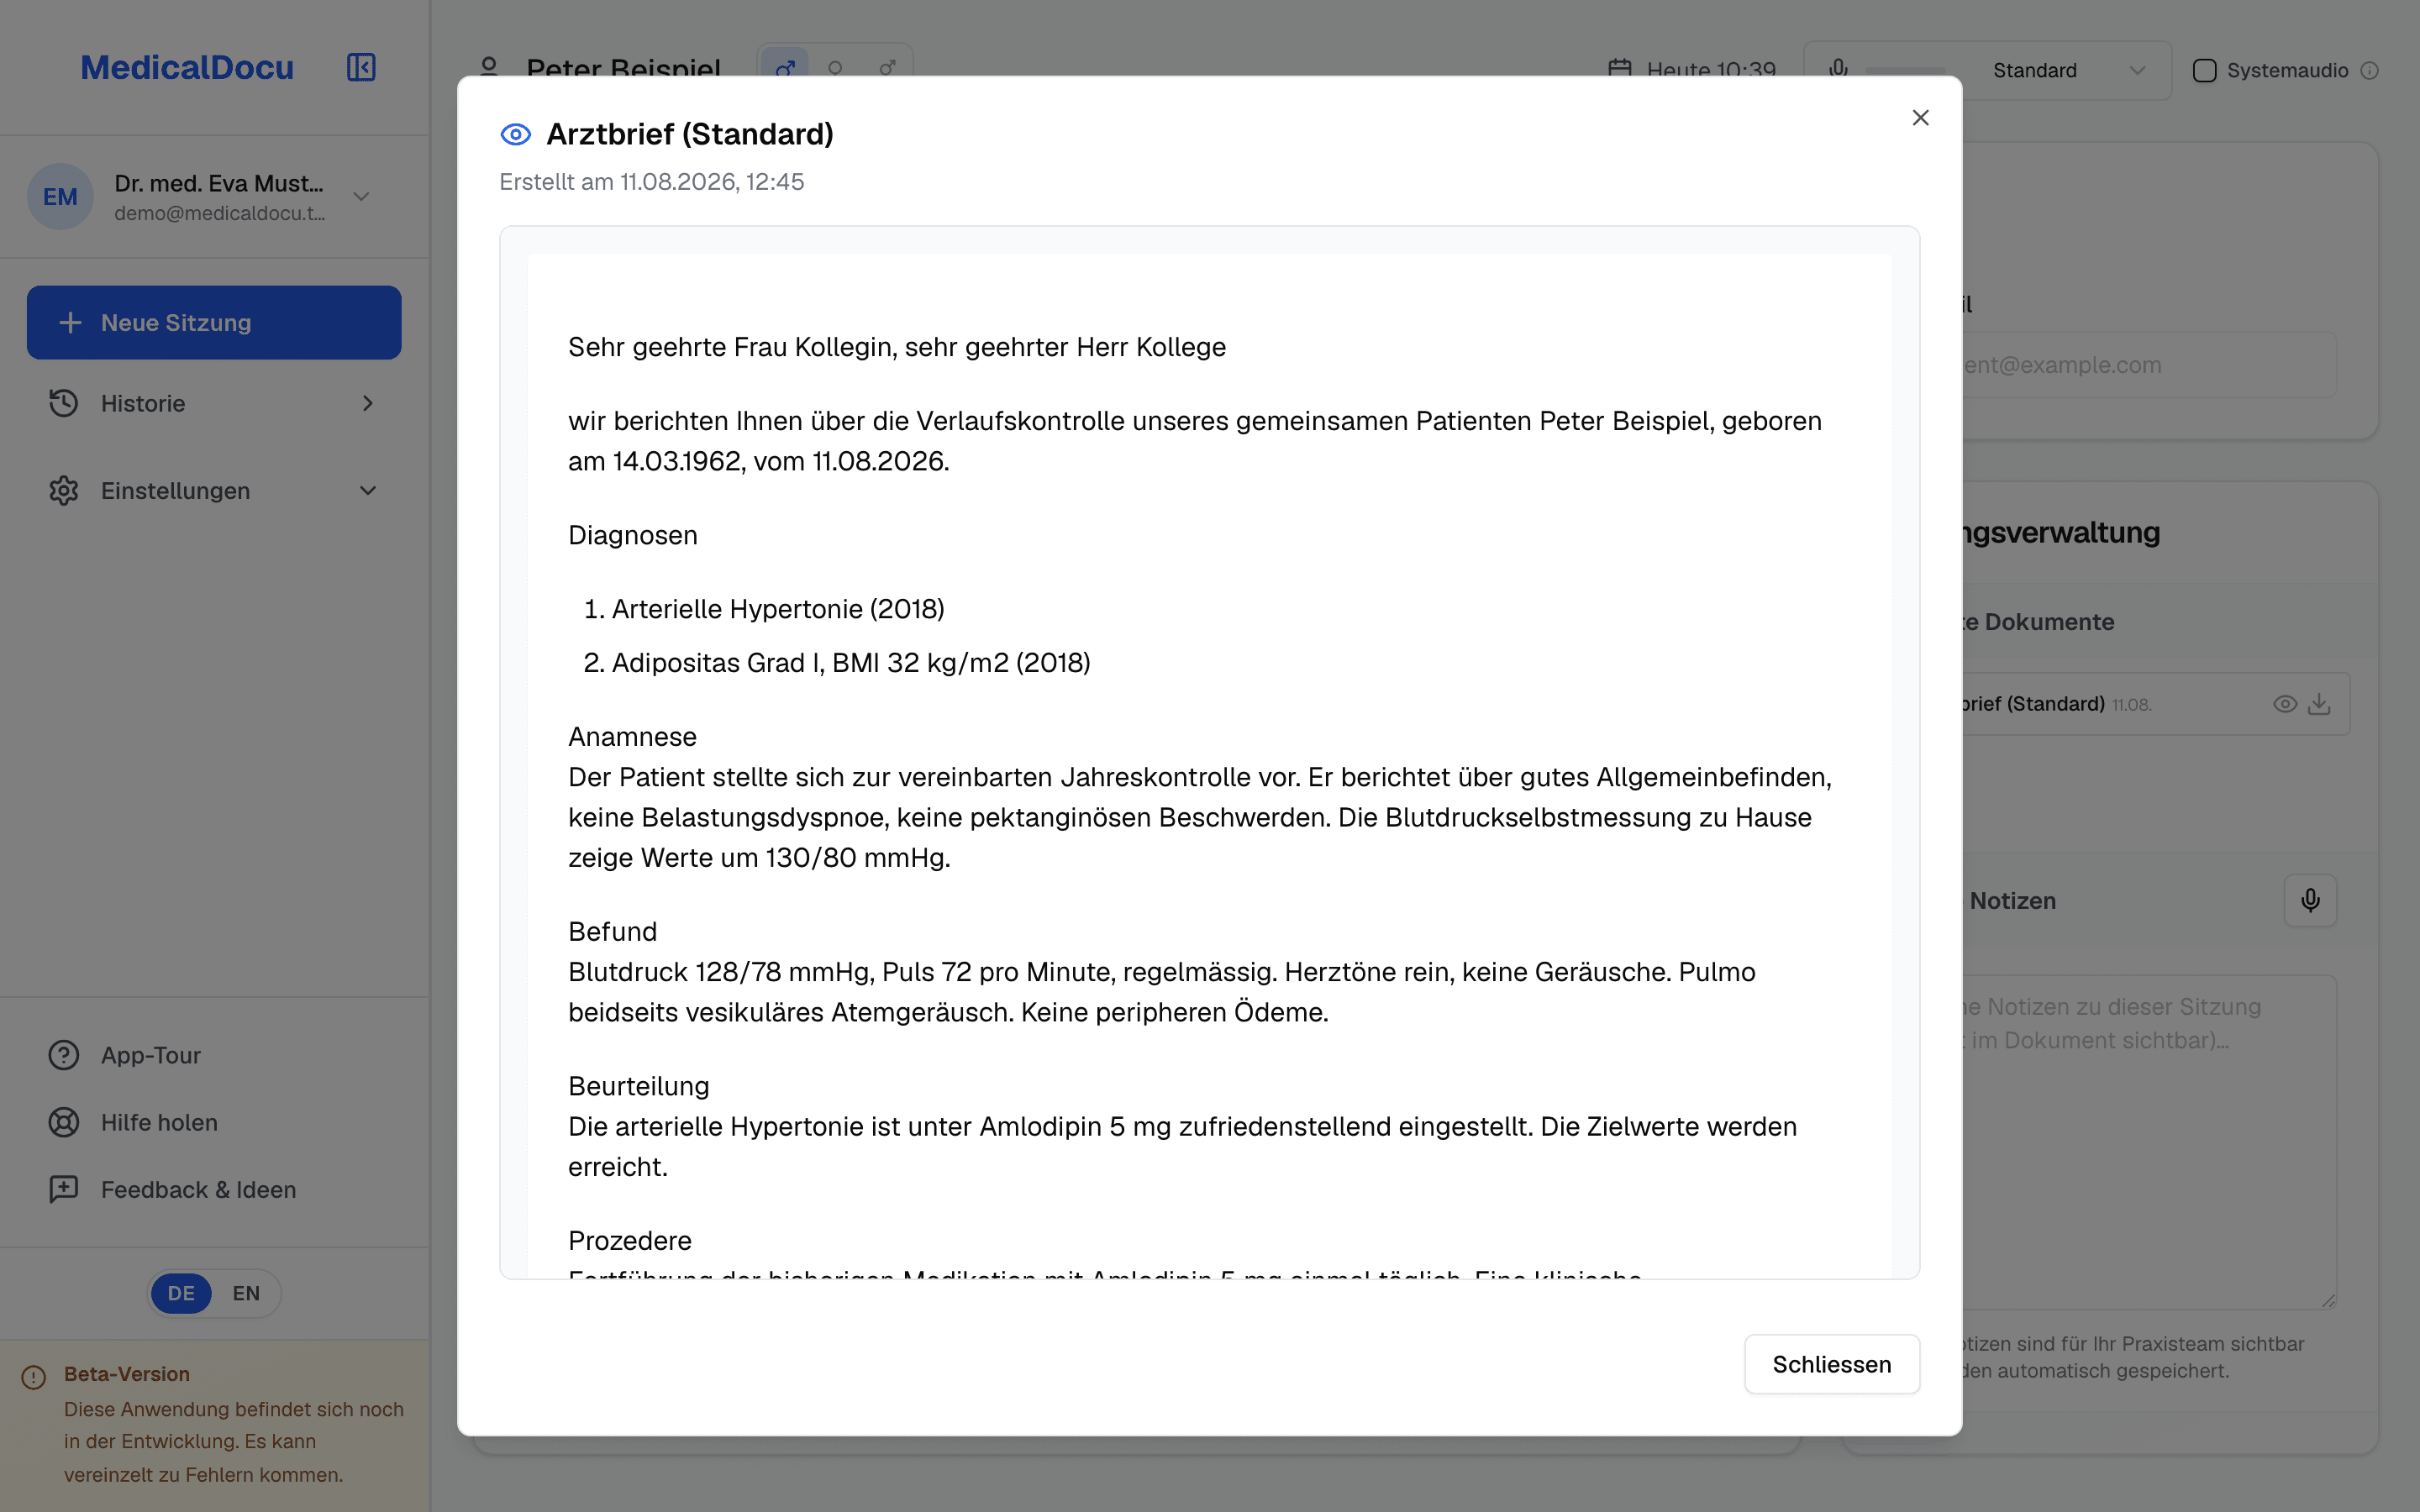
- Several documents from one consultation
- After the first document, click "Create document" again and pick a different type. From one consultation you get the specialist letter, the progress note for the record and the referral one after another, without entering anything twice.
- Internal notes
- The field below is for your practice team and appears in no document. It saves automatically as soon as a patient name is set.
- Closing and unlocking again
- "Close session completely" marks the case as done and protects it against accidental changes. If you do need to adjust something later, open the session from the history and unlock it there.
- History
- "History" in the sidebar opens the list of all sessions, grouped by day, with search and filters. One click loads the session back with its input and every document created from it.
6
Templates: the blueprint for a document type
A template describes how a given document type is structured. You find templates under "Settings", "Templates". System templates for the common document types ship with the product and are marked with a purple badge.
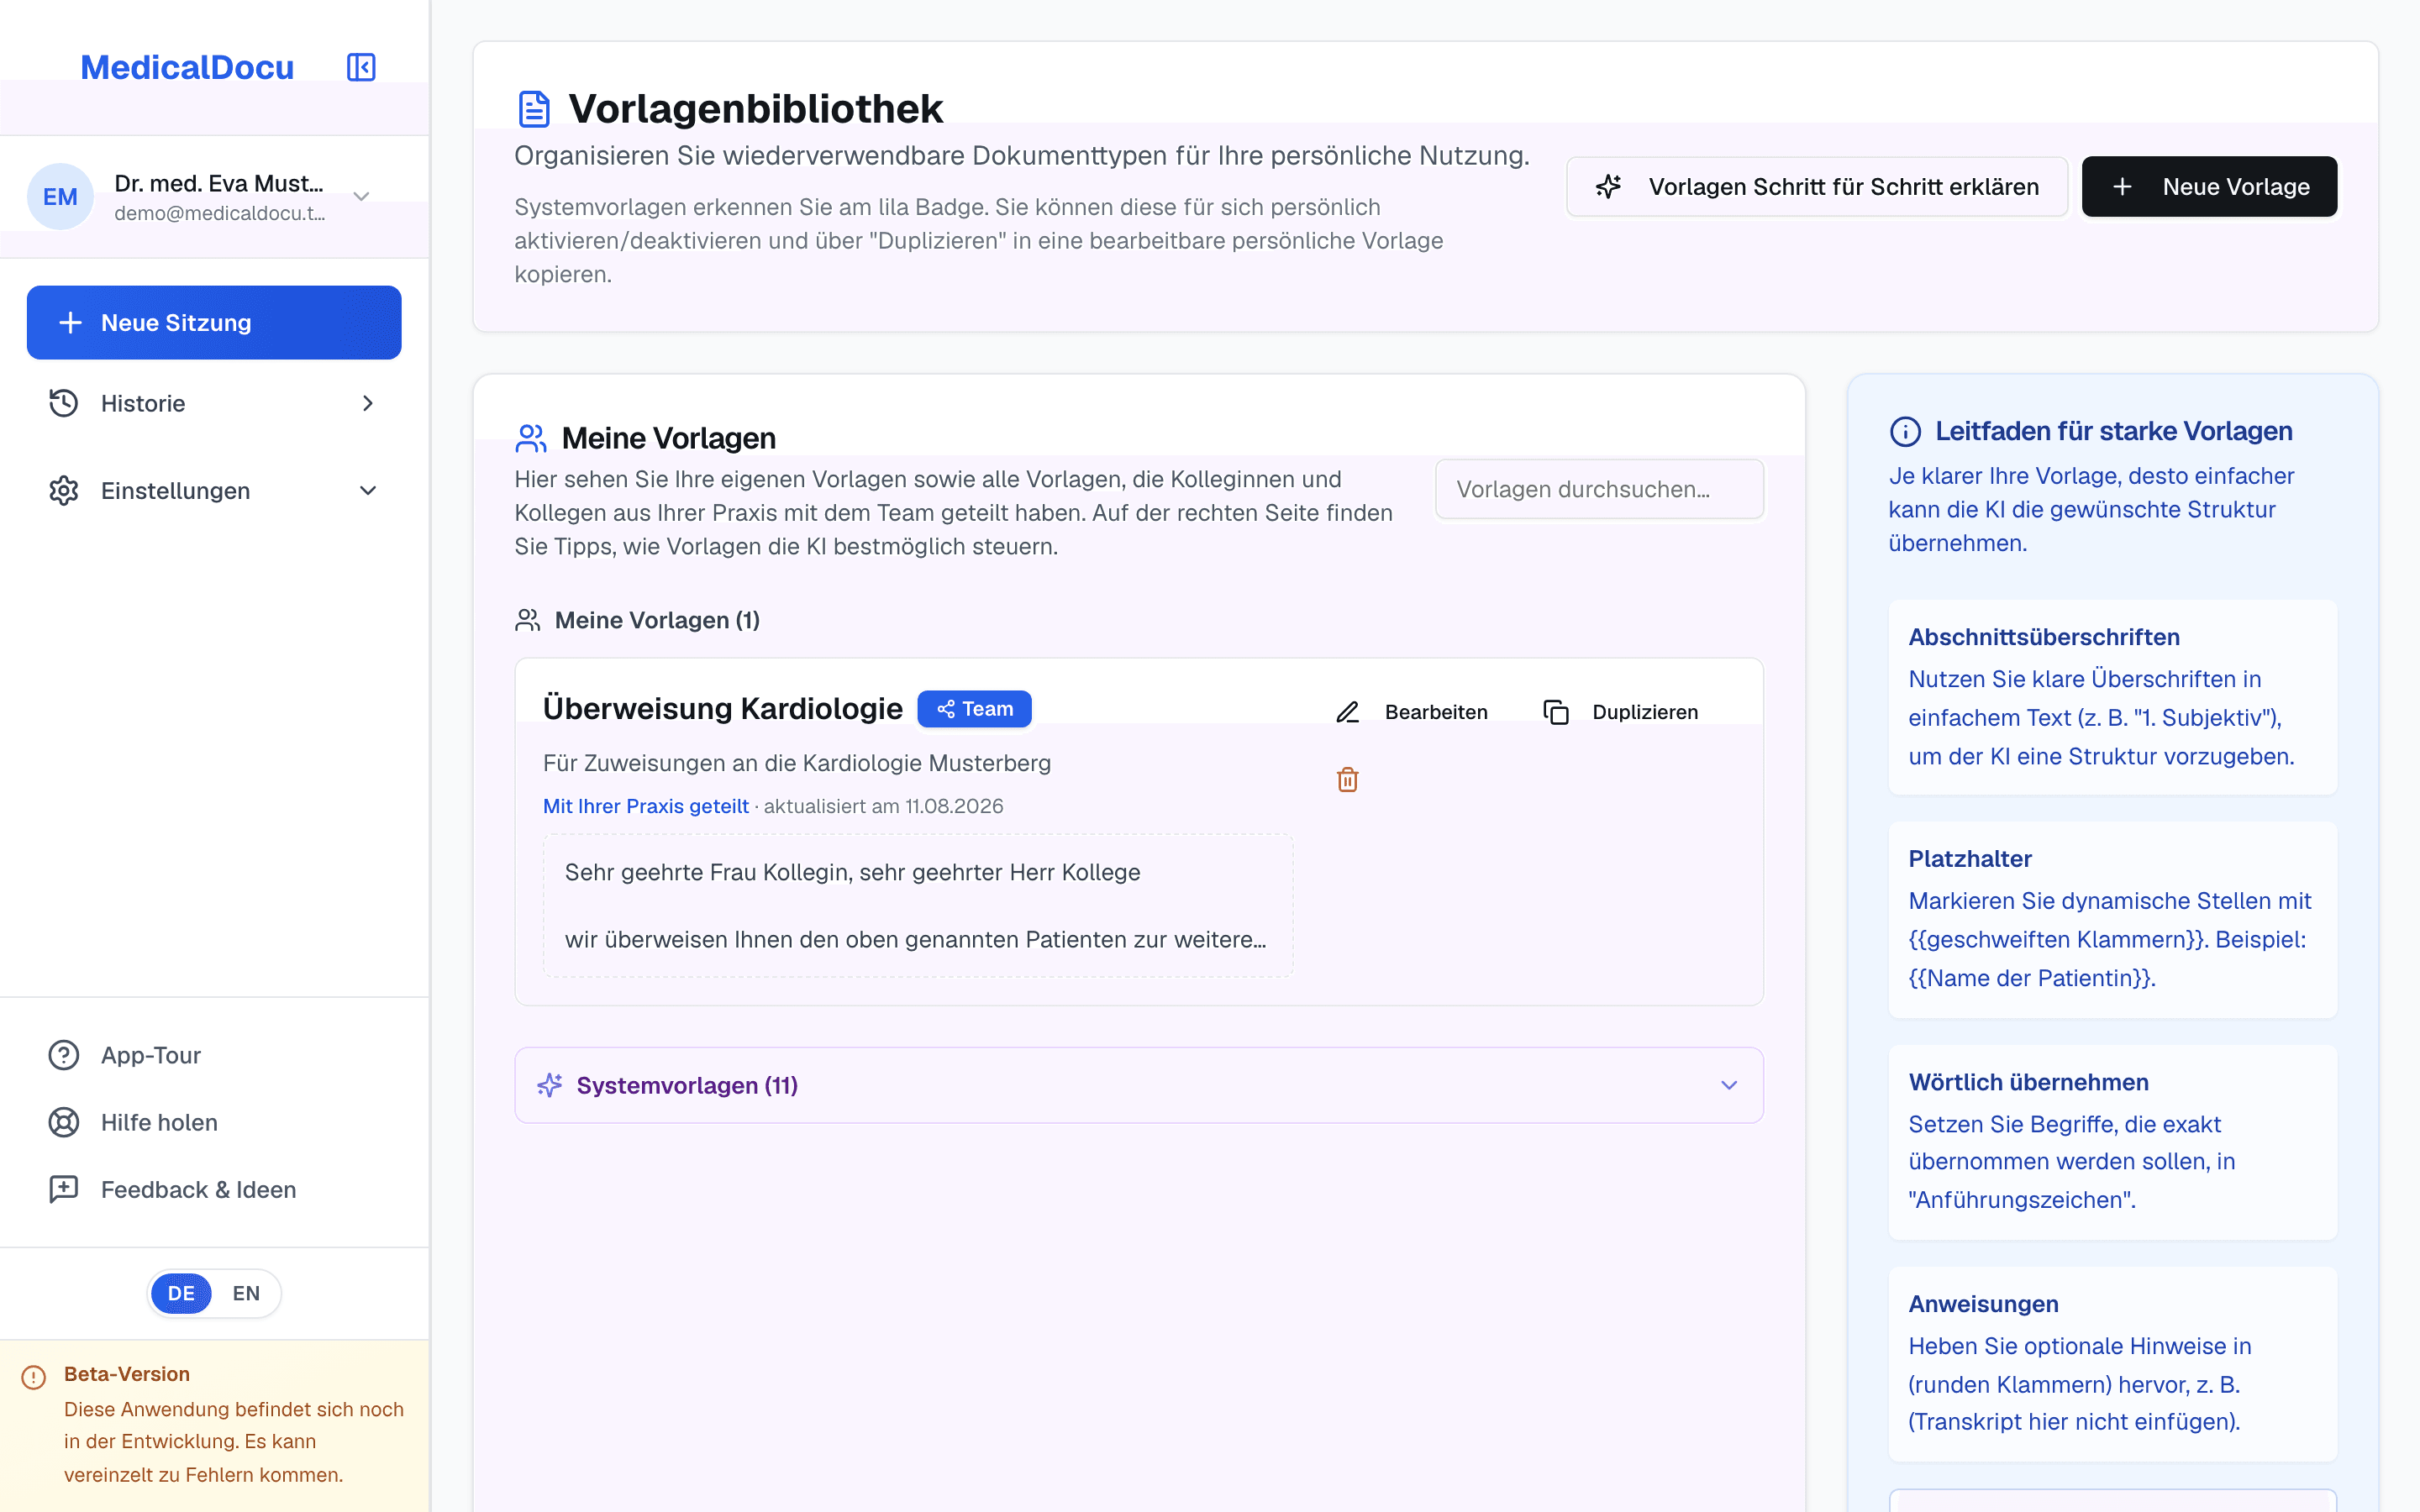
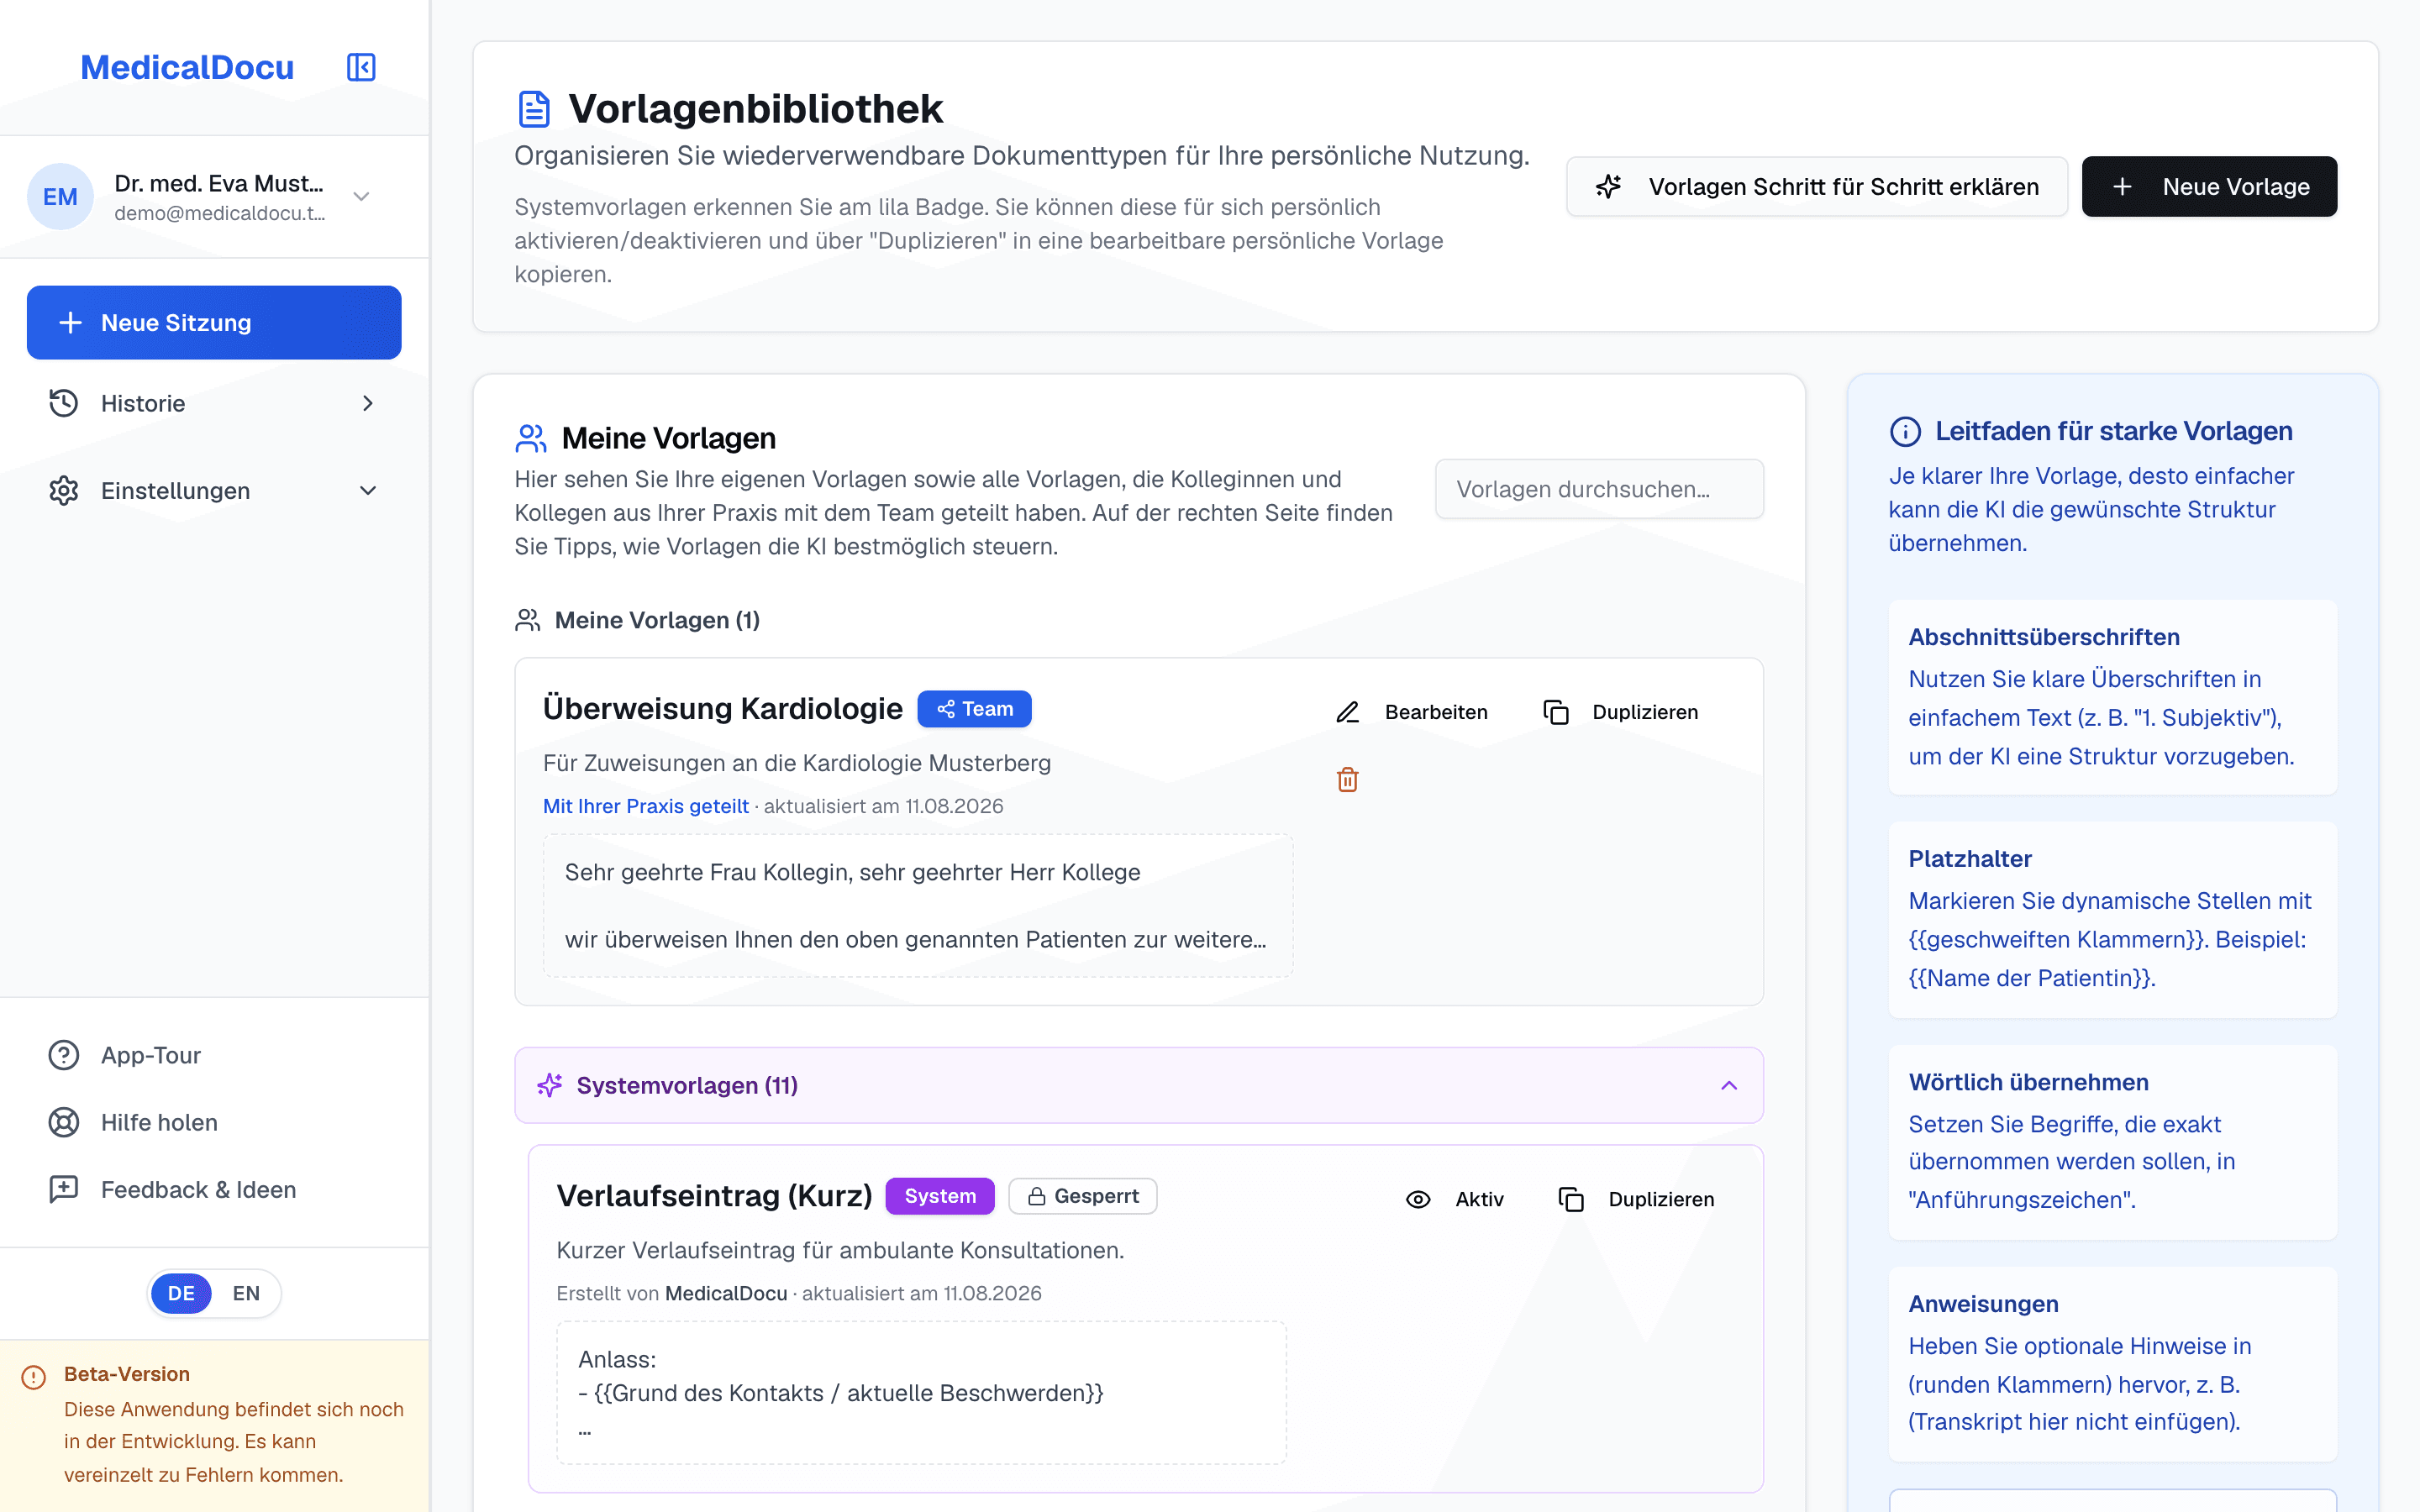
- System templates
- These templates are locked and cannot be edited directly. You can activate or deactivate them for yourself so that the selection list only contains what you actually use.
- Duplicating is the fastest route to your own template
- "Duplicate" turns a system template into one of your own that you can edit freely. That is almost always faster than starting from nothing: keep what fits and adapt the rest to your practice.
- The fields of a template
- "Internal name" is the label in your list and in the selection field. "Title in the letter" appears as the heading in the PDF; if you leave it empty the internal name is used. The "description" is only a reminder for you and your team.
- Several narrow templates beat one for everything
- A surgical report needs a different structure from a progress note, and a cardiology referral a different one from a psychiatric referral. The narrower a template, the more precise the result. A one-size-fits-all template forces the AI to guess.
- Visibility: private or team
- "Private" means only you see the template. "Team" means every clinician in your practice sees and can use it. Editing and deleting stay with the person who created it, even for shared templates.
7
Templates in the new format
A template in the new format is not edited as text but in an editor with a preview: the structure on the left, a made-up sample letter on the right. What you see in the preview appears in the letter; the AI writes only the contents of the sections. New templates start from «New template» with three ways to begin: with a supplied template (recommended), with your own text from Word, or empty.
- «Fixed text» and «Section»
- A template consists of two kinds of parts. «Fixed text» always reads the same, such as salutation and closing; patient name, date of birth or date are added with «Insert detail», without typing brackets. «Section» has a heading and «What should go here?»; the AI writes its content from the conversation. For each section you choose the presentation (continuous text, lines with dash, numbered, lines with label) and what should happen if the conversation contains nothing about it: omit, or show the heading with «No information.». If the AI finds nothing, it invents nothing.
- Appearance of the letter
- Under «Appearance of the letter» you set bold, CAPITAL LETTERS, both or normal for all headings, the colon after the heading and the blank lines between sections (1 or 2). Behind «More» in a section you can set its lines bold or its heading in capital letters. The arrows change the order; «+ insert» adds where you click.
- Try it out: the trial run
- «Try it out» generates a trial letter from a made-up sample case («Cough and fever» or «Check-up without findings») with the current state, even unsaved. You see it as a letter and as a copy without formatting, plus a check line whether all sections appear in the order of the template. A trial run costs one AI call; at most 20 per day. Please do not type real patient data into «Own notes».
- What arrives in Word and what in the practice software
- When copying with formatting (Word, e-mail) and in the PDF, bold, headings and blank lines are kept. When copying without formatting into the practice software there is no bold: only capital letters and blank lines carry there. If you want a heading to stand out everywhere, choose CAPITAL LETTERS. The preview and the trial run show both views in the tabs «This is what the letter looks like» and «Copy without formatting».
- «Adjust this template» after a letter
- If a letter is not right, change the template, not the single letter. Above the finished letter a note appears when something worth mentioning happened (such as omitted sections), and next to it the button «Adjust this template»: it opens the template used in the editor, «Back to the letter» leads back.
Templates in the previous format stay as they are and can still be edited as text. «Transfer to new format» creates a new template next to it and takes over headings and structure, no sentences; the previous template is kept.
8
How to write a template (for templates in the previous format)
This chapter applies to templates in the previous format, which are edited as text; templates in the new format need no brackets, see the chapter before. The content of a template goes to the AI unchanged. So you are not writing for a program that expects a particular syntax, but for a colleague who types the letter for you and does exactly what it says. Four devices are enough.
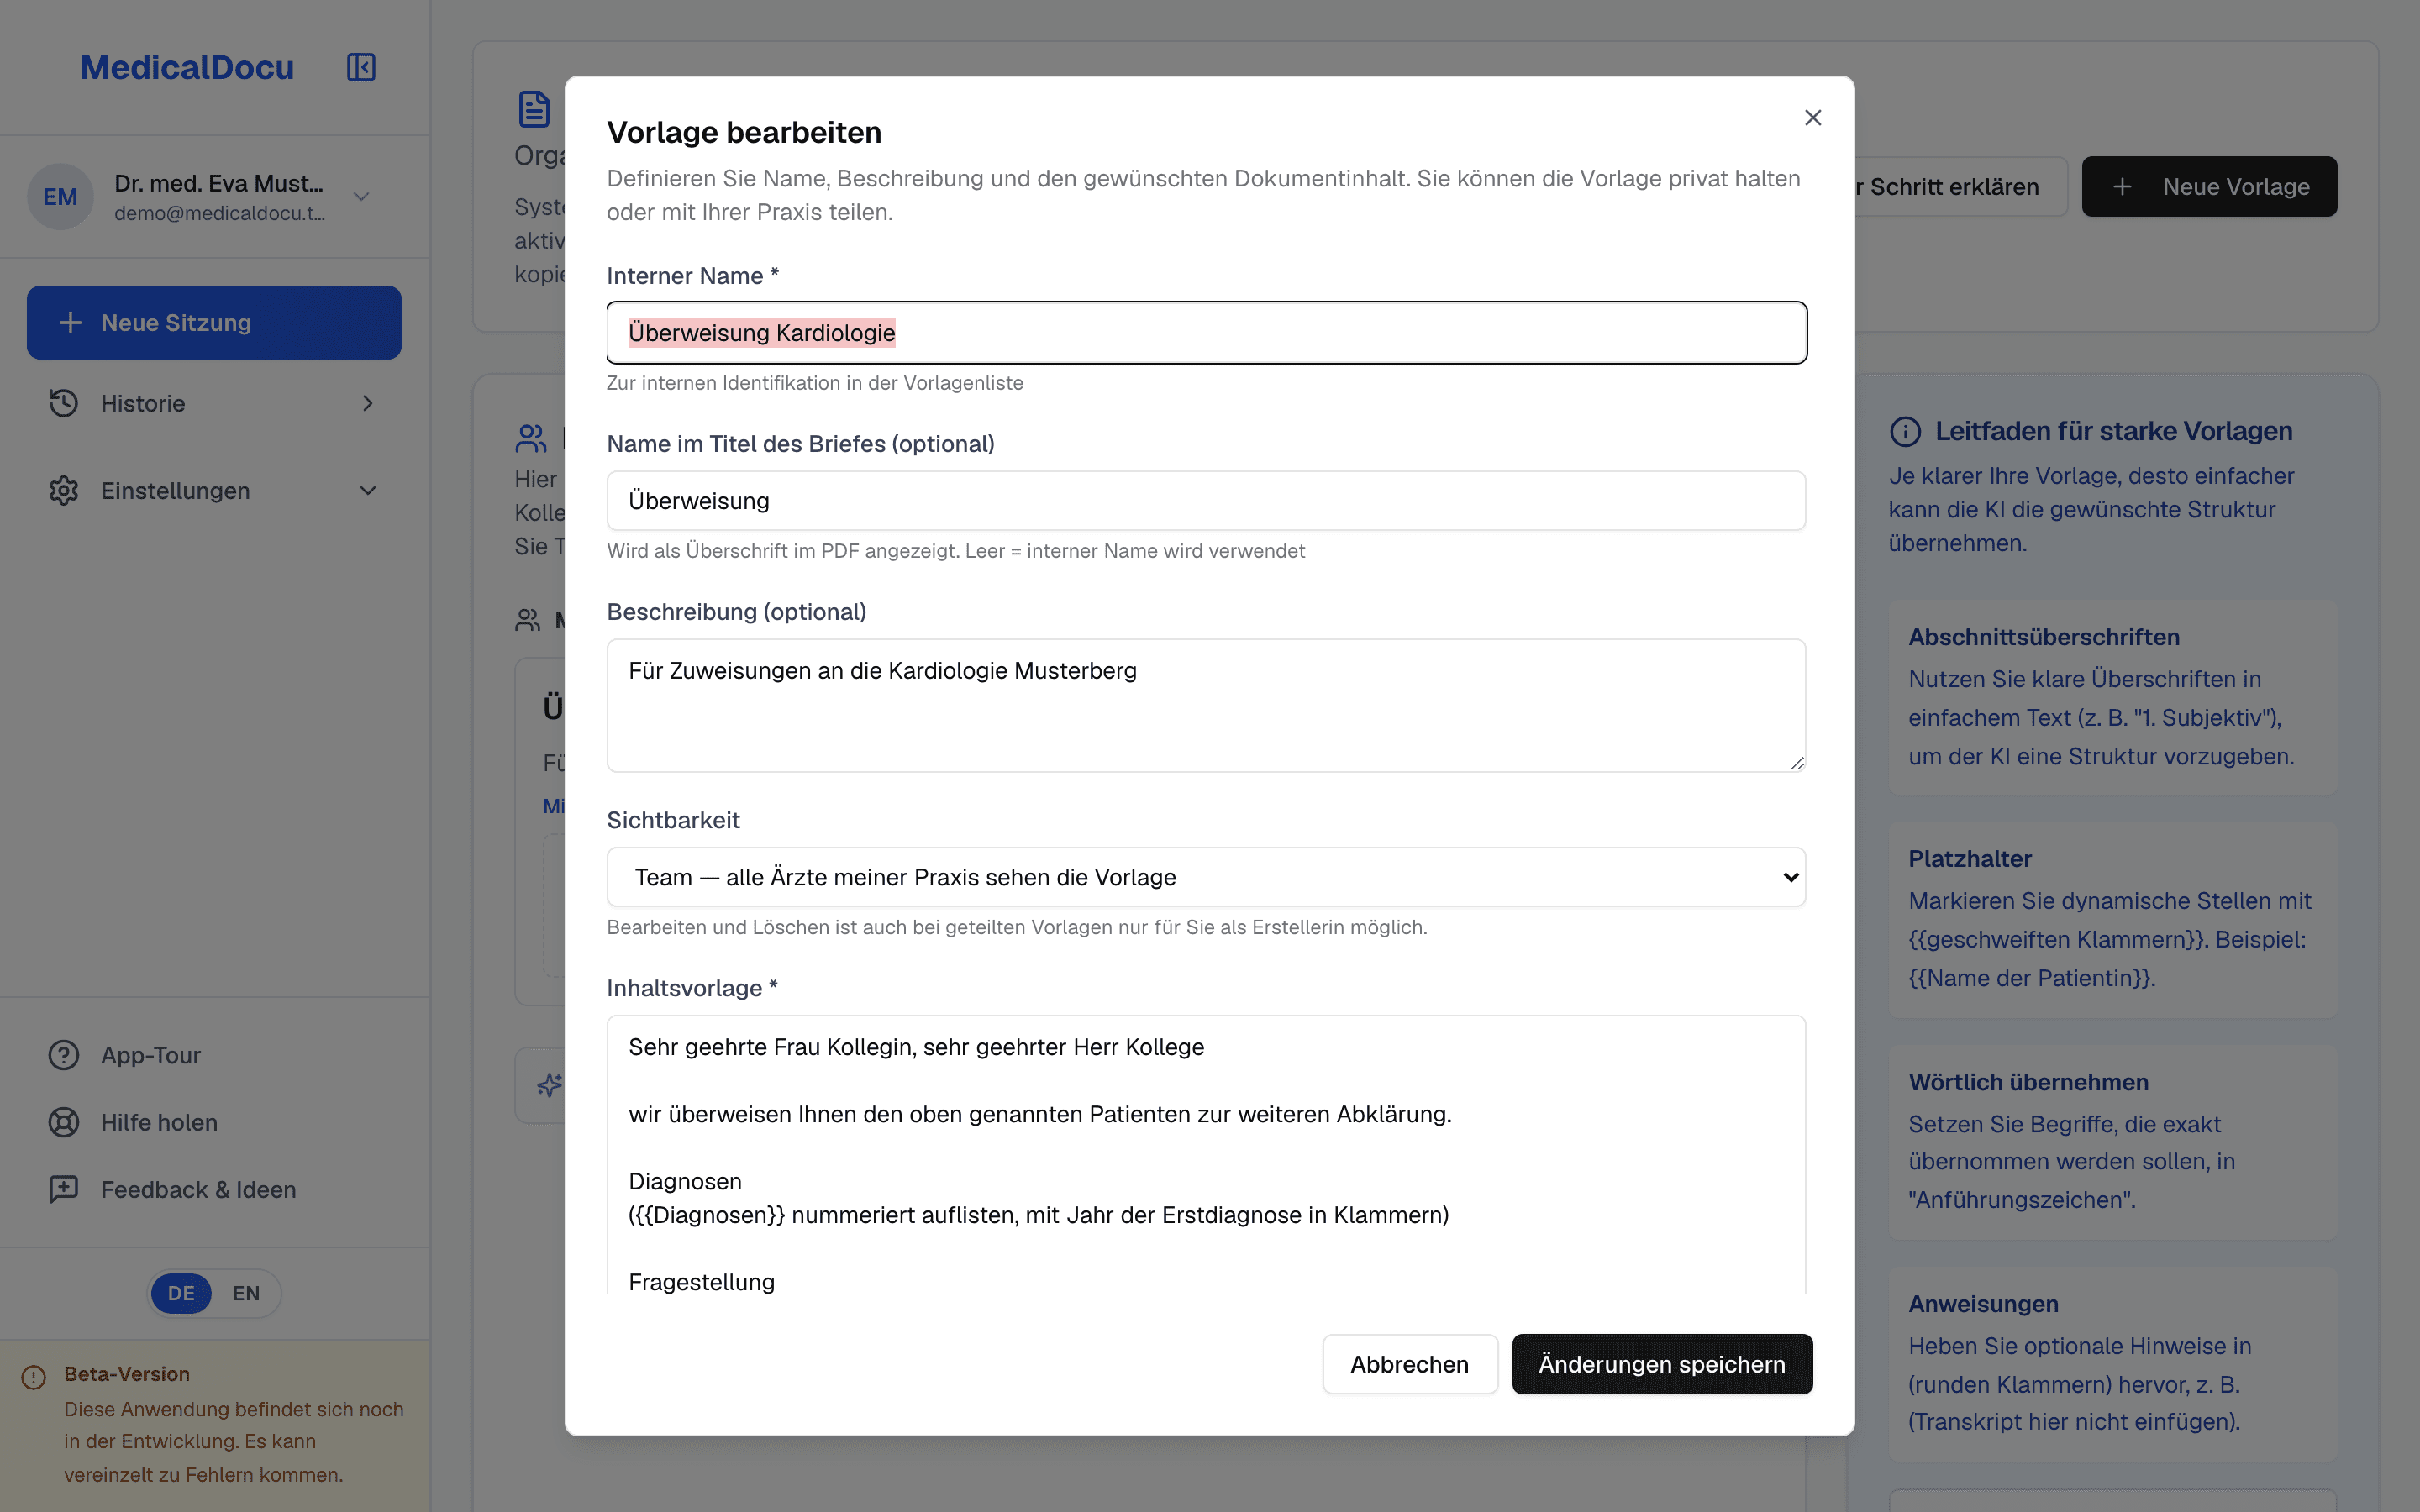
- Section headings
- Anything on its own line without brackets becomes a heading in the document. "Diagnoses", "History", "Findings", "Assessment", "Plan" give the text its structure, and the AI keeps that order.
- Curly brackets for placeholders
- Double curly brackets mark a spot to be filled from the consultation. The text inside tells the AI what belongs there. The more specific the description, the better the result: a placeholder saying "question for the cardiologist" works far better than one saying "text".
- Quotation marks for verbatim text
- Anything in quotation marks appears exactly like that in the document. Intended for closing formulas, legal notices and standard sentences that must never vary.
- Round brackets for instructions
- Round brackets tell the AI what to do without the bracketed text appearing in the document. For example "list numbered, with year of first diagnosis" or "only mention if raised in the consultation".
The most common mistake in a first template is writing too little. A template with five headings and no instructions leaves the AI guessing. Be too specific rather than too brief; you can always cut back later.
A complete template as an example
This is what a custom referral template looks like. Headings define the structure, curly brackets mark what comes from the consultation, round brackets steer the AI, and the sentence in quotation marks always appears verbatim.
Dear colleague

we are referring the above patient for further assessment.

Diagnoses
({{Diagnoses}} list numbered, with year of first diagnosis in brackets)

Clinical question
{{Specific question for the colleague}}

Assessments so far
(only mention what is relevant to the question)

Current medication
({{Medication}} with active substance, dose and regimen)

"Please do not hesitate to contact us with any questions."
9
The rule set: the setting that matters most
You find the rule set under "Settings", "Rules". It is the most effective and most overlooked setting in the product. A template applies to one document type; the rule set applies to every document you create. It defines how you write, not what the document contains.
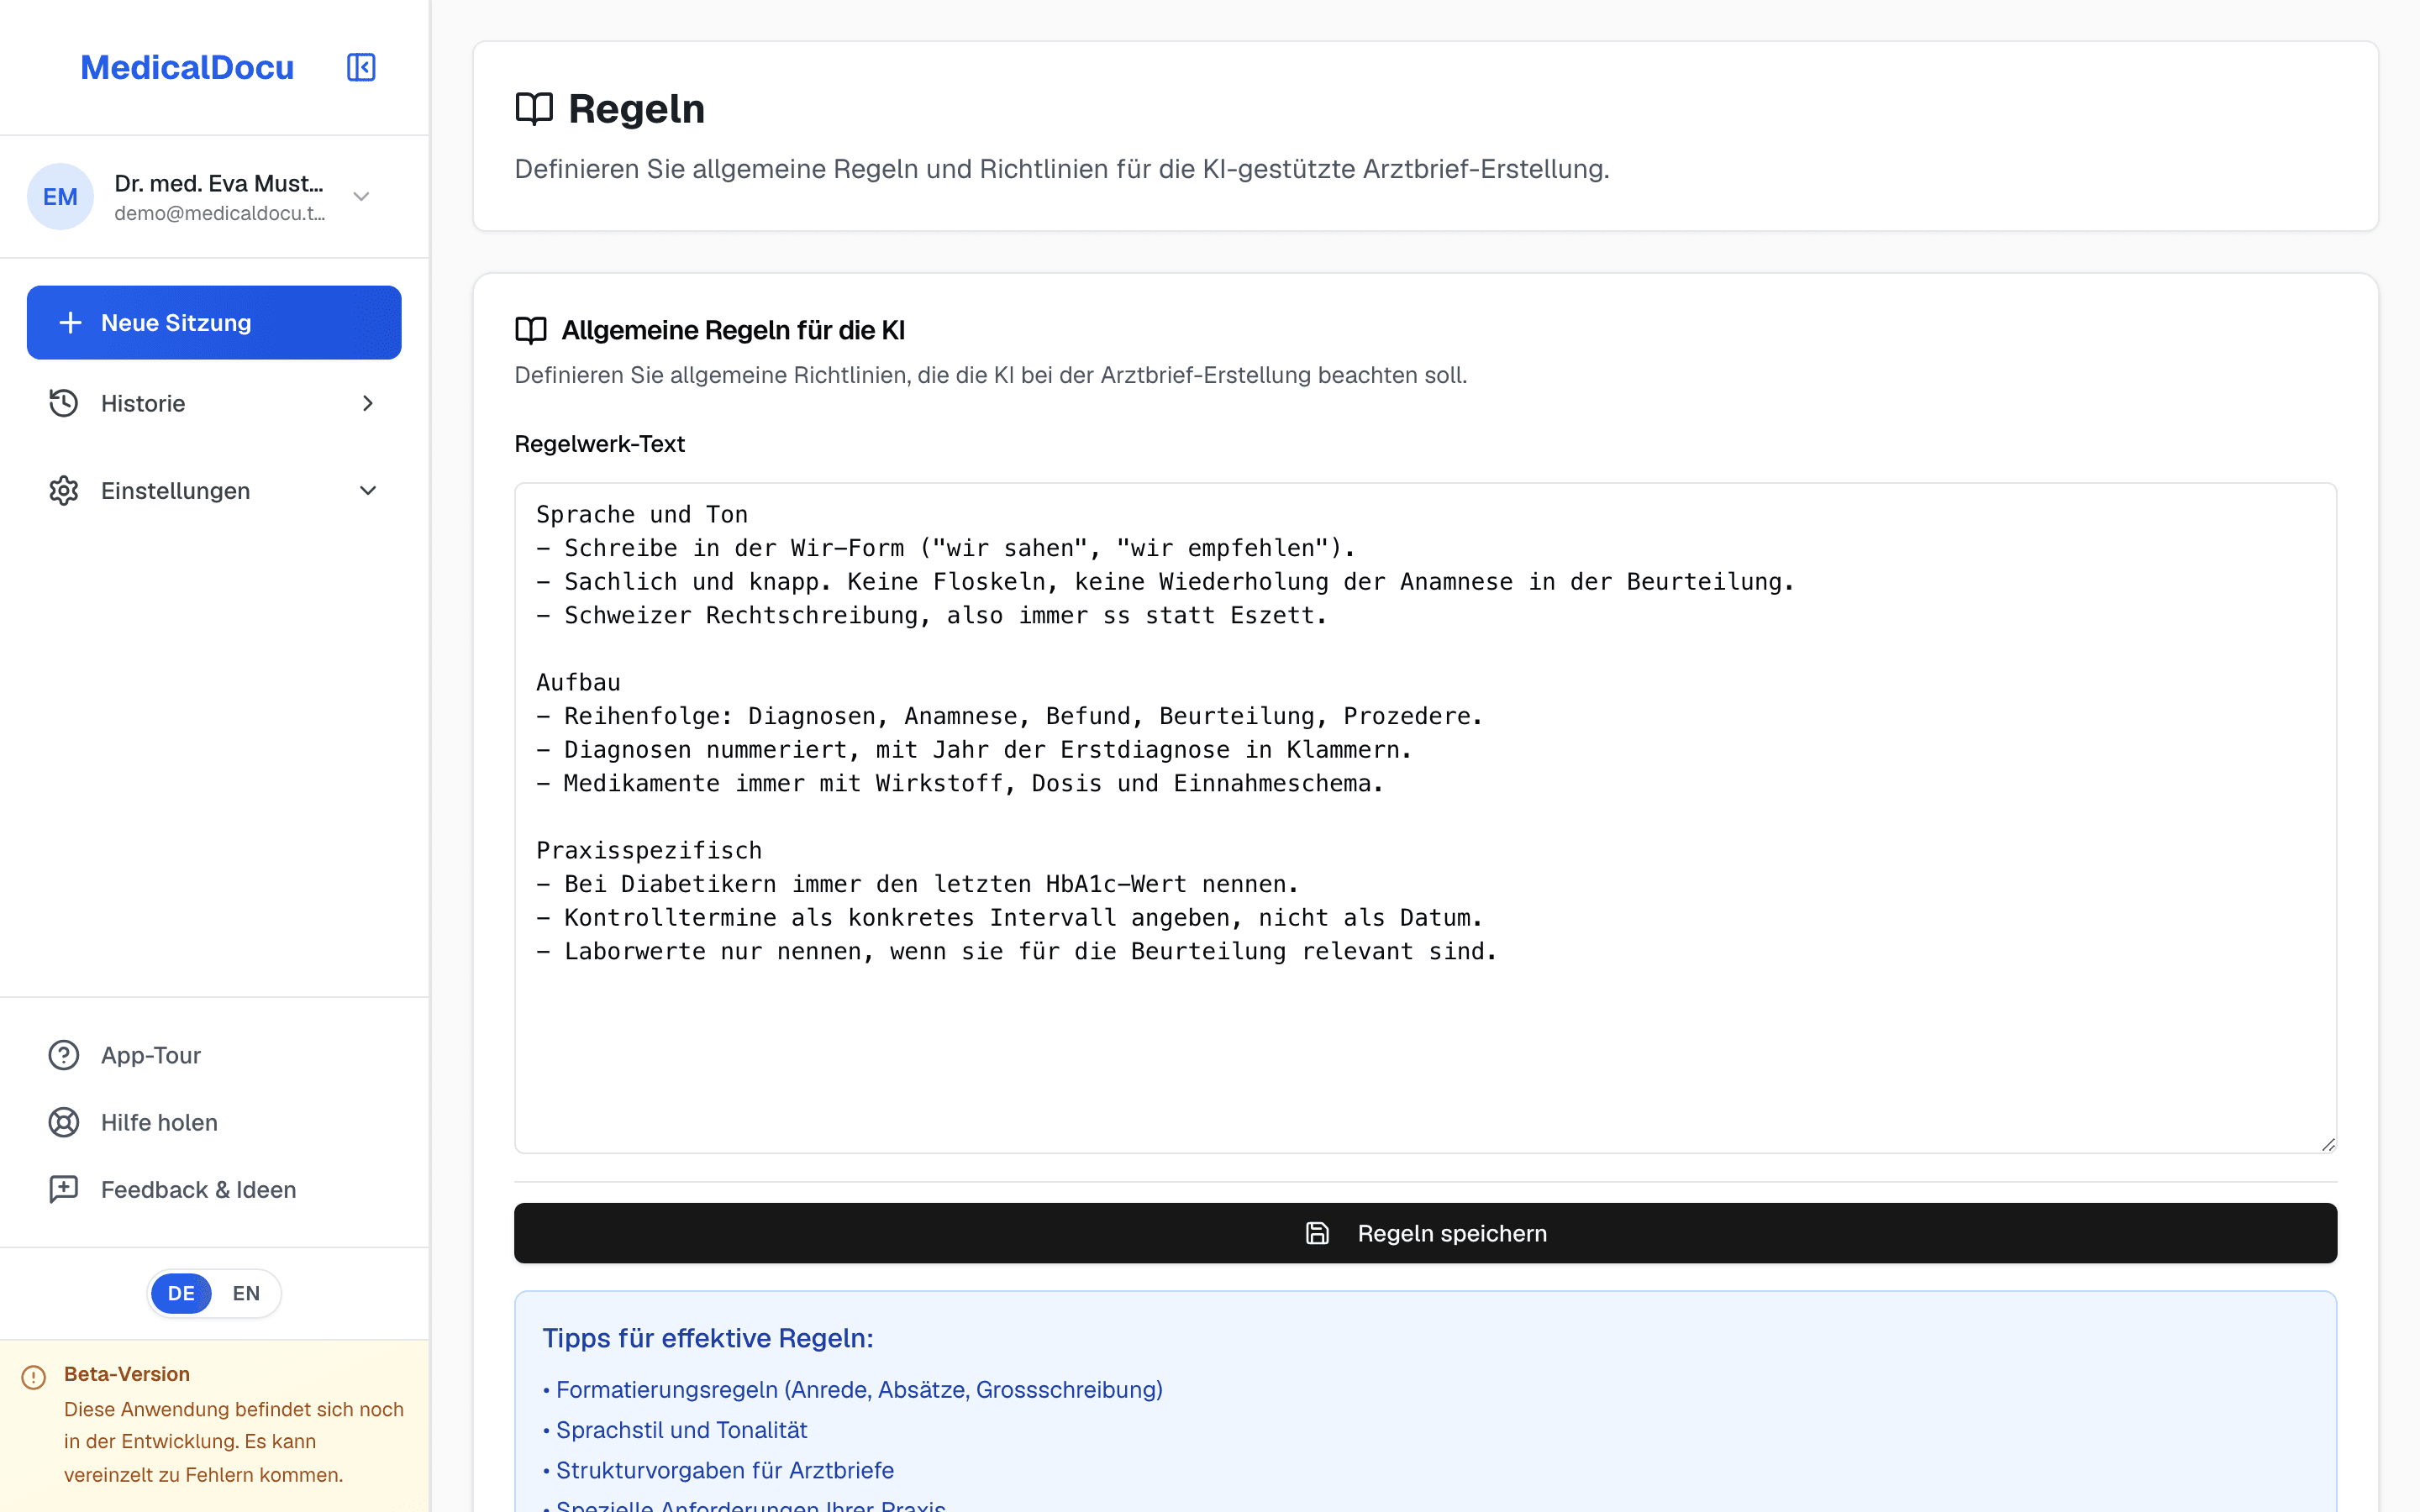
- Template or rule set?
- Rule of thumb: anything that concerns only one document type belongs in the template. Anything that holds for every letter belongs in the rule set. "The referral starts with the clinical question" is a template matter. "We always write in the first person plural" is a rule.
- Specific instead of general
- "Write professionally" changes nothing, because the AI already tries to. "No filler phrases, no repetition of the history in the assessment" changes something, because you can check afterwards whether it was followed. Write rules so that you can tell whether the AI obeyed them.
- Where the rules come from
- From your own corrections. When you have changed the same thing in a draft for the second time, phrase that change as a sentence and add it. After a week or two your house style is written down and the corrections largely stop.
- What usually belongs there
- Salutation and closing formula. First person singular or plural. Spelling conventions. The order of sections. Whether medication is named by active substance or brand name. Whether lab values are always listed or only when abnormal. Which details must never be missing for certain diagnoses.
- How long the rule set should be
- Ten to thirty precise lines work better than two pages. Very general or mutually contradictory rules dilute the result instead of improving it. If a rule never changes anything, delete it again.
10
Abbreviations: your personal dictionary
Under "Settings", "Abbreviations" you record your shorthand. The abbreviation on the left, what it stands for on the right.
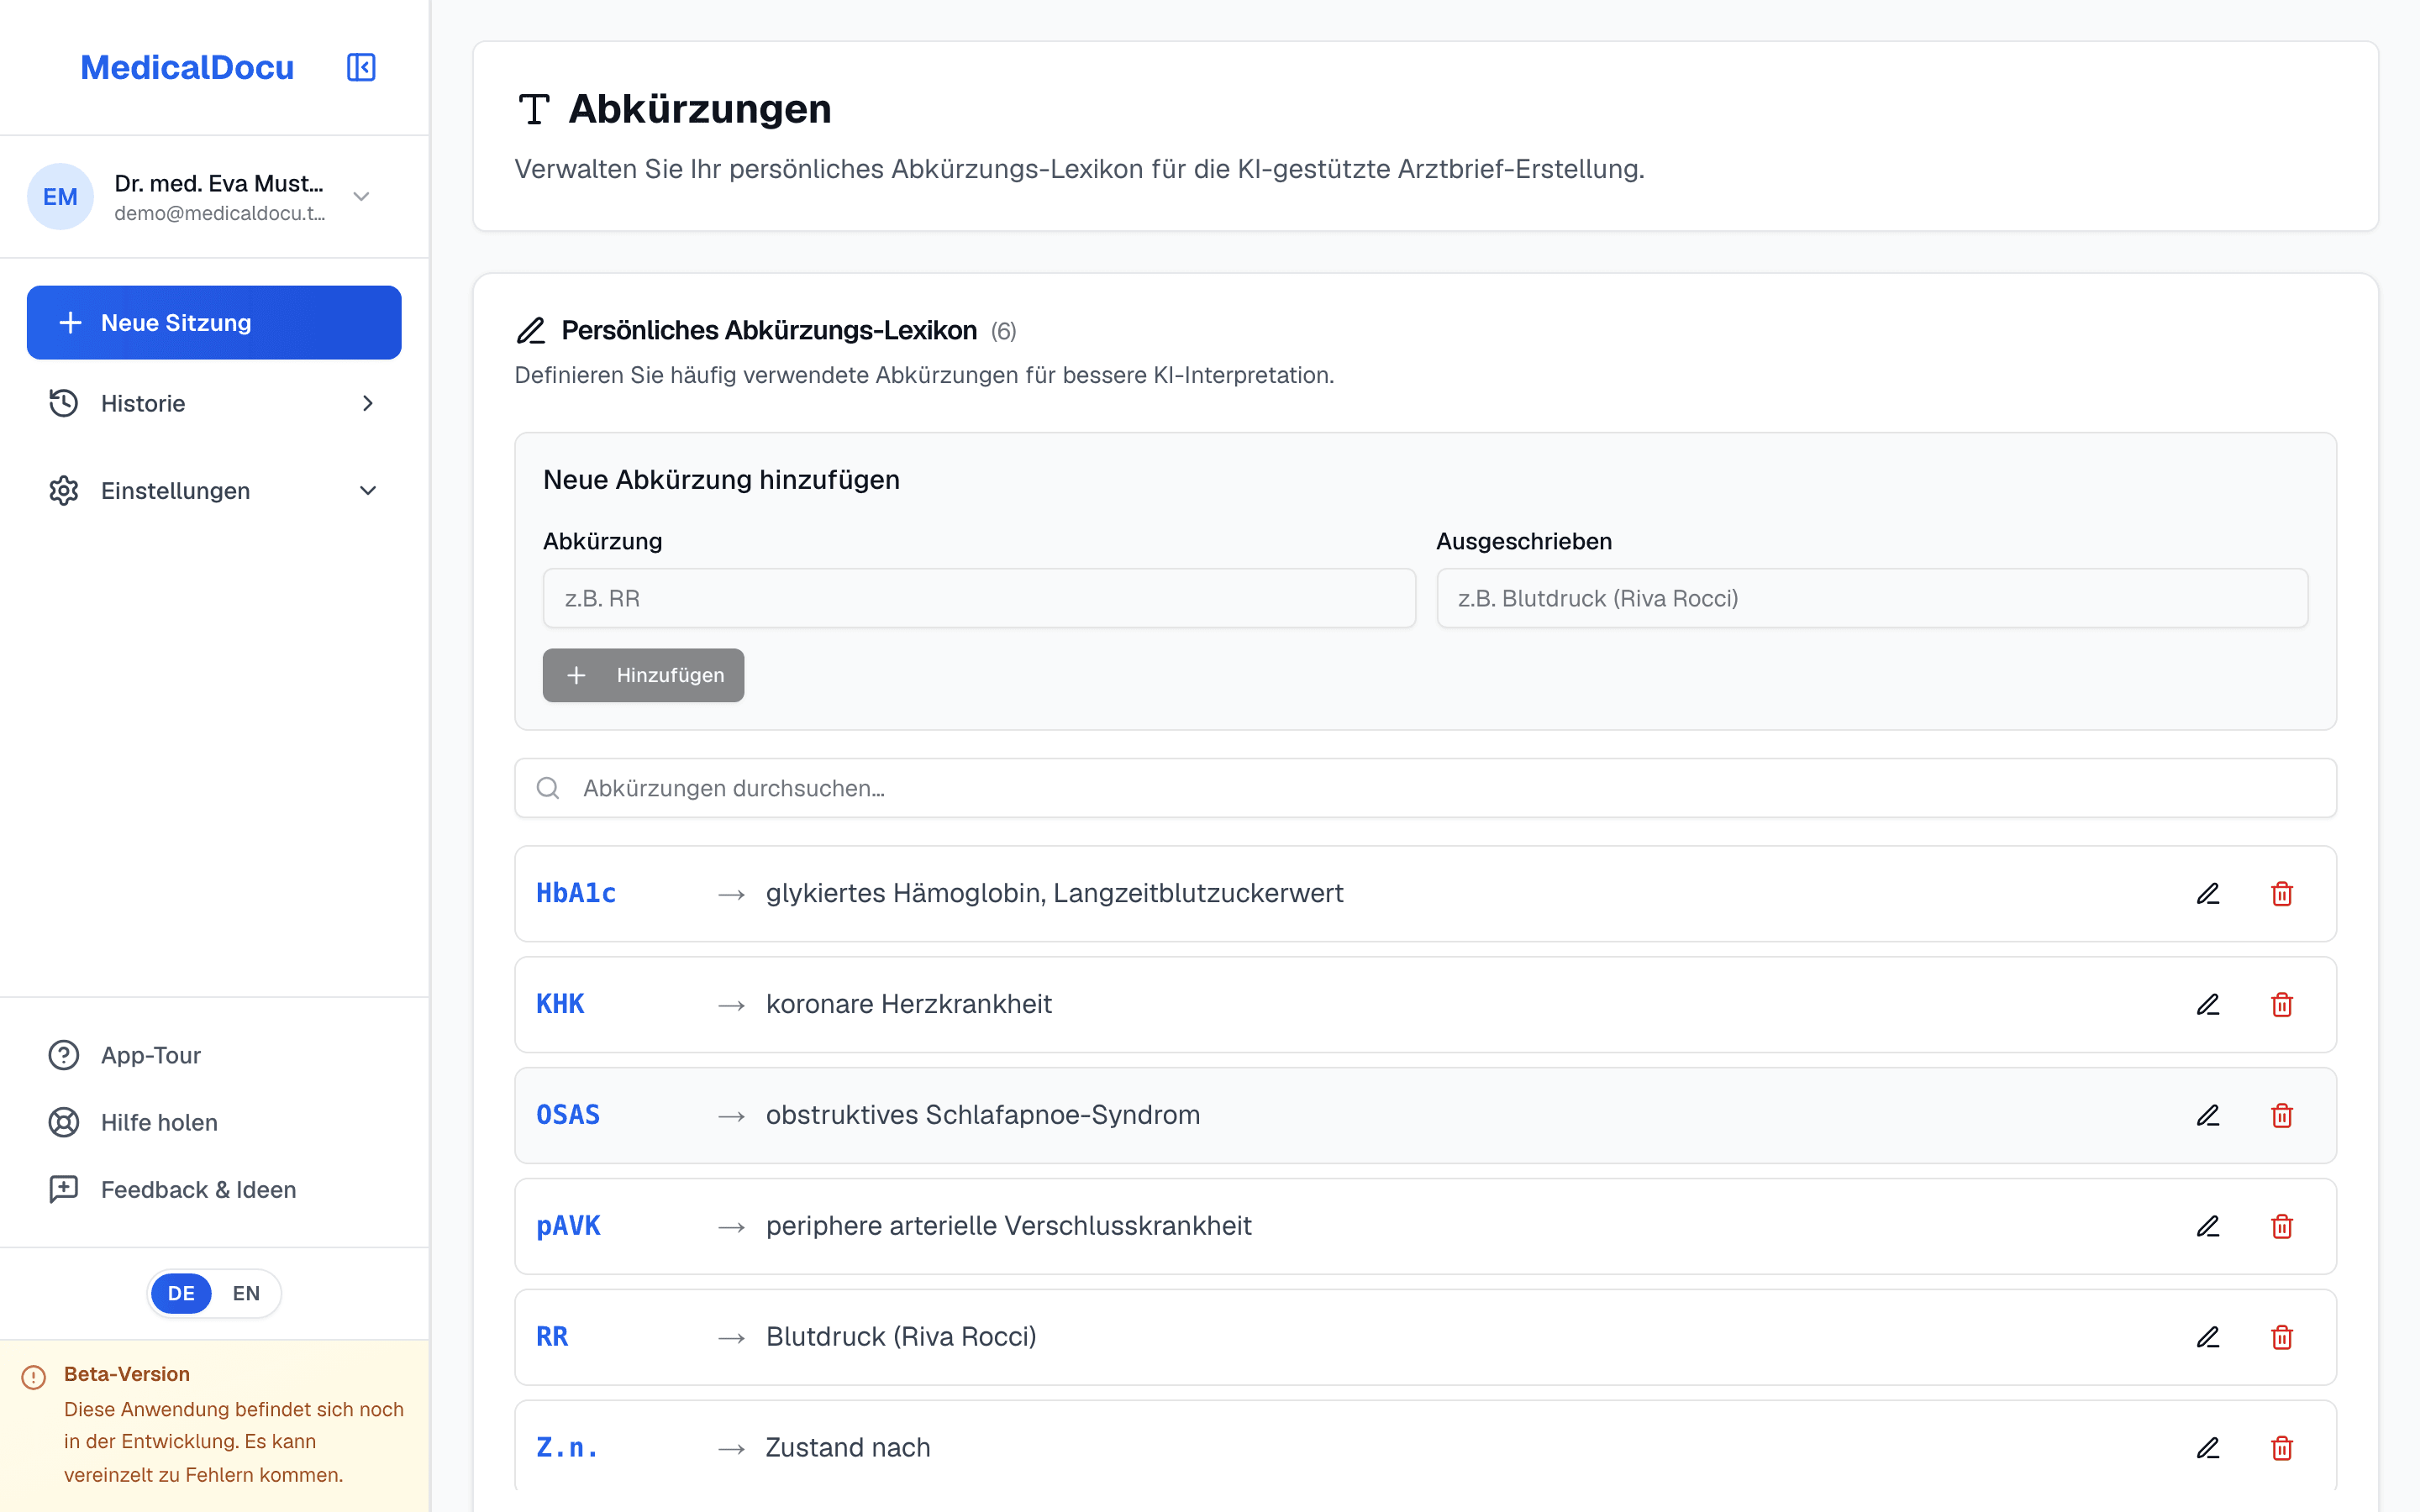
- Why this helps
- Speech recognition hears a spoken sequence of letters and has to guess what was meant. Once the abbreviation is in your dictionary the guessing stops and the AI spells it out correctly in the document. This pays off most for terms that expand differently depending on the specialty.
- Which ones to add
- Everything you shorten when dictating that could be ambiguous. Practice-specific shorthand first, then the terms of your specialty. Twenty well chosen entries do more than a hundred obvious ones.
11
Text snippets: recalling ready-made phrasings
Text snippets are phrasings you insert with a shortcut instead of typing them every time. The shortcut on the left, the text that is taken over verbatim on the right.
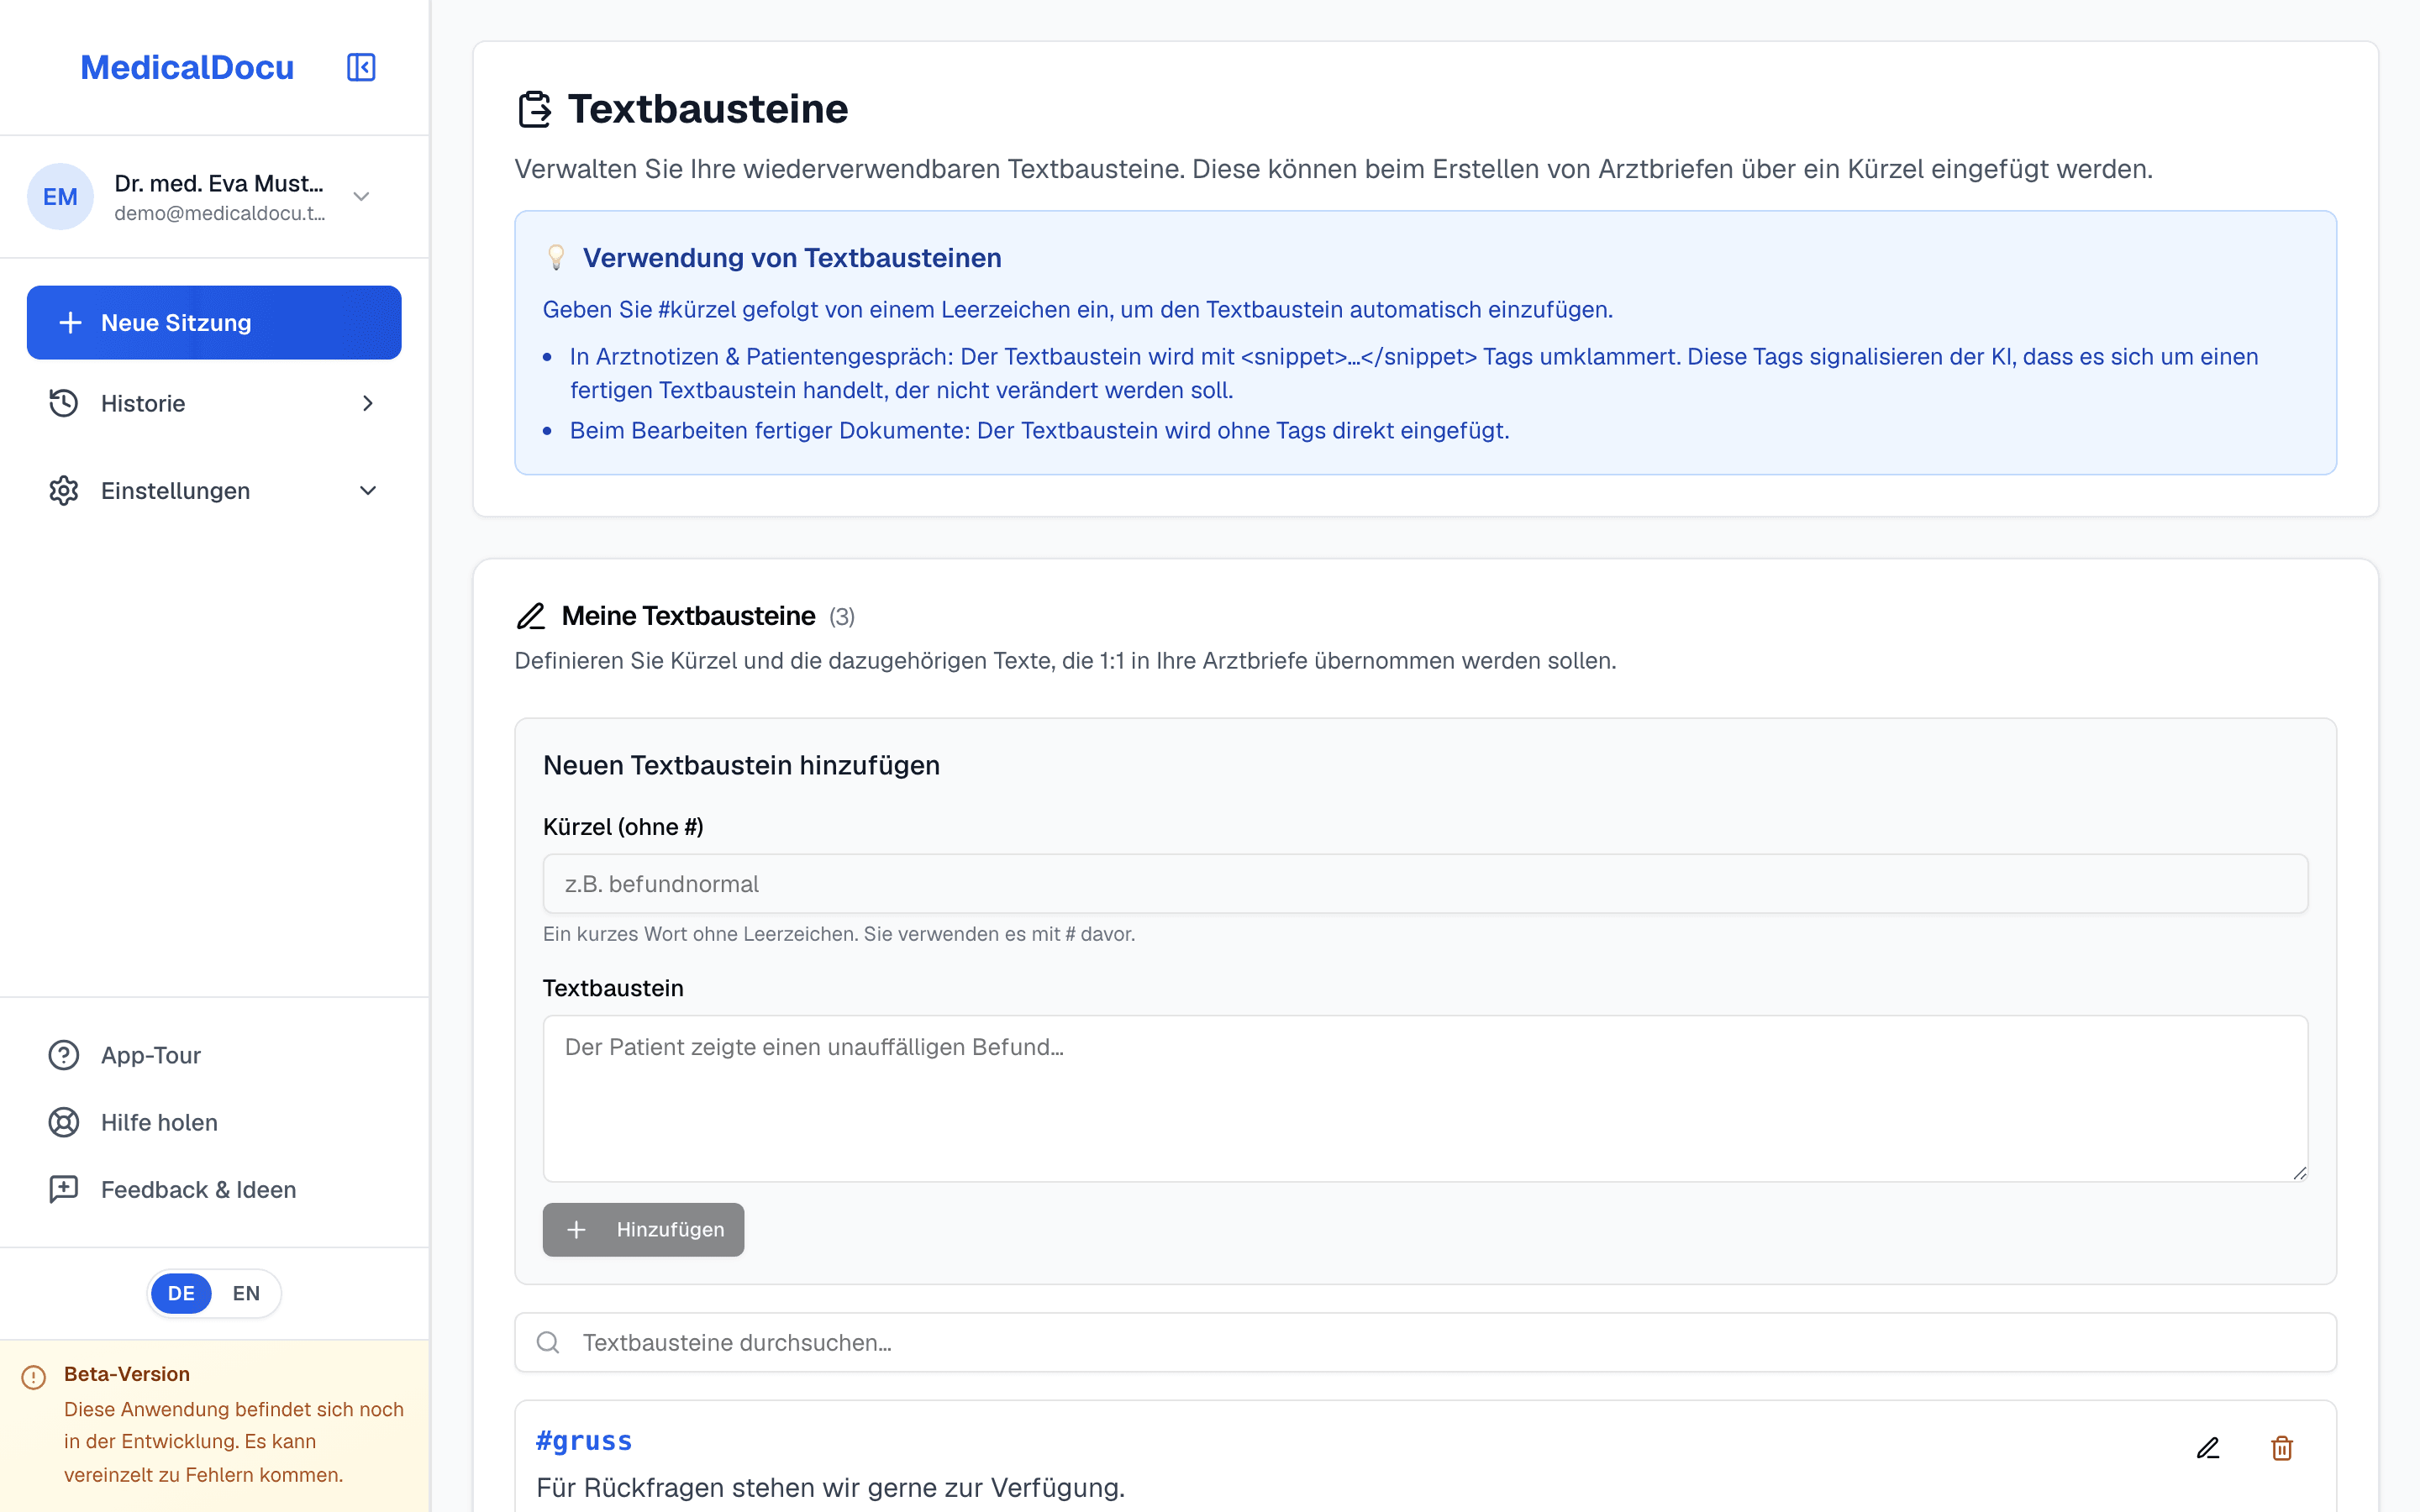
- How to recall a snippet
- Type a hash, then the shortcut, then a space. The stored text appears in that spot. This works in the clinician notes, in the patient conversation and while editing a finished document.
- The difference in effect
- In the clinician notes and the patient conversation the snippet is marked for the AI as a finished block that it should not rephrase. When editing a finished document it is simply inserted as text.
- Snippet or template?
- A snippet is text you deliberately insert. If a sentence should appear in every document of a type, put it in quotation marks in the template instead. Then you never have to recall it at all.
12
Recipients: your practice address book
Under "Settings", "Recipients" you maintain the addresses you write to regularly: referring colleagues, hospitals, institutes, insurers.
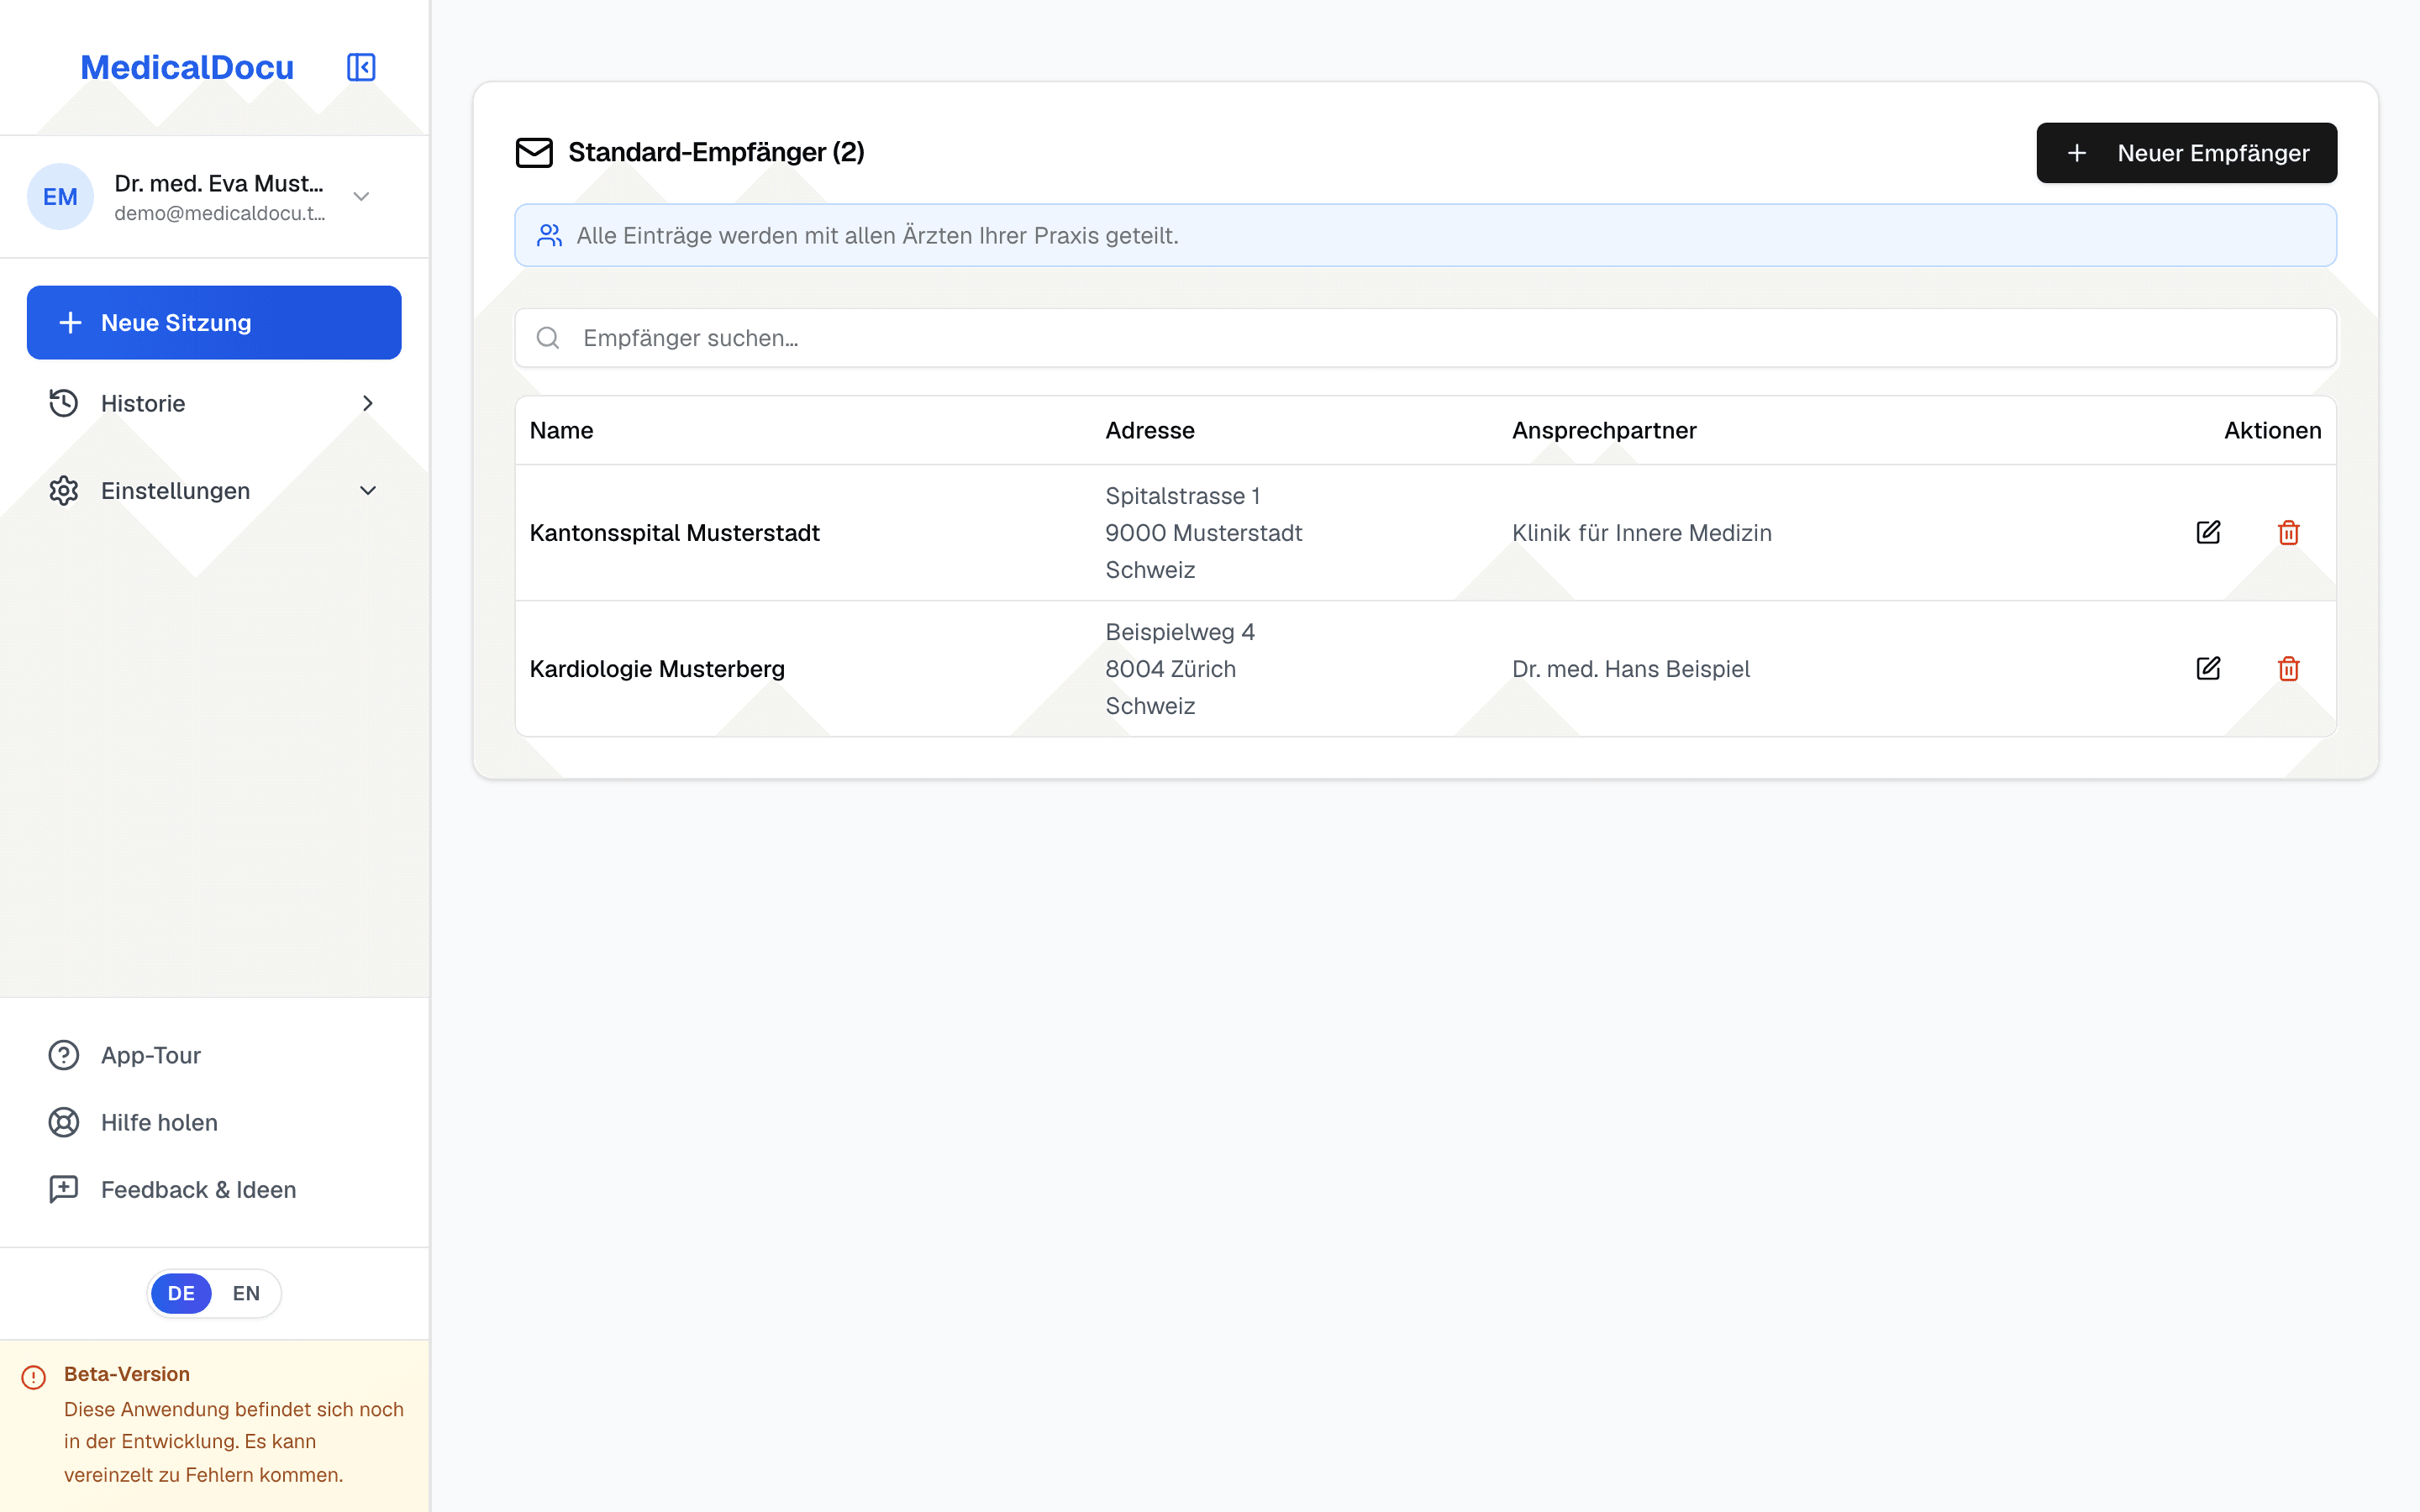
- What this gives you
- With the recipient stored, the salutation and address block are correct without rework, and when creating a document you just pick them from the list. Name, street, postal code and city are required; the contact person is optional.
- The list belongs to the whole practice
- Every entry is visible to all clinicians in your practice. Whoever maintains an address maintains it for everyone.
13
Practices with several people
Not everyone has to do the setup themselves. What is shared and what is not is a deliberate choice.
- Set up once, everyone benefits
- Templates can be shared across the practice and the recipient address book applies to everyone anyway. So one person does the setup and everyone else uses it. The rule set, abbreviations and text snippets are personal, because every clinician writes differently.
- Working with practice assistants
- If a medical practice assistant works with you, they can see the finished documents, maintain the processing status and leave internal notes, without having access to the recording itself.
14
When the result is not right
Almost every complaint maps to one of the three levers. This overview saves you the search.
- The document is too long or too short
- Change the level of detail first. If the length is consistently wrong, the fix belongs in the rule set, for example: the assessment is at most five sentences.
- The tone is off
- That is almost always the rule set. Describe the style you want in concrete instructions rather than adjectives.
- The sections are wrong
- That is the template. Check whether the headings are there and in the order you want.
- The document contains something that was never discussed
- Check the transcript first. Often the sentence was spoken, just phrased differently. Otherwise add a rule that nothing may be added which is not in the input. Either way: every document is reviewed by you before it leaves your practice.
- The transcript has gaps
- Check the selected microphone and the count of saved audio chunks next to the transcript. A headset resolves most cases.
- The result is unconvincing overall
- Repeat once with the "Advanced" AI mode. If that fixes it, save "Advanced" as the default for this document type.
15
Responsibility and data protection
Two points we would rather not bury in the small print.
- You remain responsible
- MedicalDocu produces drafts. Clinical and legal responsibility for anything that leaves your practice stays with you. Review every document before you sign it off, exactly as you would with a dictated letter.
- Where your data lives
- We are a Swiss company. Your patient data is stored in Switzerland and encrypted throughout: TLS 1.3 in transit, AES-256 at rest. No AI models are trained on your data. The details are in the privacy policy.
- We will set it up with you once
- If you are serious about using MedicalDocu and would rather have someone alongside you while setting up your templates, get in touch. We do that with you once, free of charge, in about half an hour.
Stuck, or something does not work as described? Write to us. A short note on what you expected and what happened instead is enough: info@medicaldocu.com